Most homeowners don’t realize how much their outdoor lighting affects the way their property looks and feels after dark. The right lighting design can turn an ordinary front yard into something guests remember. The wrong approach can make even a million-dollar home look flat, harsh, or overdone.
After 15 years designing and installing custom landscape lighting systems across Orange County, we’ve seen both ends of the spectrum. We’ve seen properties where the lighting makes everything come alive, and we’ve seen installations that actually make homes look worse than no lighting at all.
These outdoor lighting tips come directly from the field, from real projects in Newport Beach, Irvine, Coto De Caza, and throughout Southern California. If you’re planning a new system or trying to improve what you already have, this guide will help you understand what separates professional results from everything else.
Start With Design, Not Fixtures
The most important outdoor lighting tip we can share is this: a great lighting system starts with a design, not a shopping cart full of fixtures. Yet most homeowners, and frankly many contractors, skip straight to product selection without ever thinking about what the lighting should actually accomplish.
Professional outdoor lighting design considers how your home is experienced at night. How do guests approach the front door? Where does the eye travel first? What deserves emphasis, and what should recede into shadow?
Before placing a single fixture, walk your property after sunset and identify what you want people to notice. The best landscape lighting tips all share this principle: start with intention, not installation.
1. Layer Your Lighting for Depth and Dimension
Professional landscape lighting uses three distinct layers working together: ambient lighting for overall illumination, task lighting for functional areas like steps and cooking spaces, and accent lighting to highlight focal points such as trees, water features, or architectural details.
The magic happens when these layers are balanced properly. Too much ambient light washes out the dramatic effects of accent lighting. Insufficient task lighting creates safety hazards despite beautiful aesthetics. Think of it like setting a stage. Every layer has a role, and the performance falls apart if one dominates.
This layered approach is one of the most effective outdoor lighting design tips because it creates the depth and dimension that makes properties feel expansive and inviting rather than flat and overlit.
2. Use Warm Color Temperatures (2700K to 3000K)
Color temperature is measured in Kelvins (K) and determines whether light appears warm and golden or cool and bluish. For residential landscape lighting, the sweet spot is between 2700K and 3000K.
At 2700K, you get a soft, inviting glow similar to candlelight. This range is ideal for patios, seating areas, and architectural facades on traditional homes. At 3000K, the light is slightly crisper and brighter, which works well for highlighting green foliage and complementing modern architecture.
Anything above 4000K starts to look bluish and clinical outdoors. It makes landscapes appear unnatural and creates an uninviting atmosphere. One of the most common LED outdoor lighting tips we give homeowners: stick to warm whites and keep your color temperature consistent across the entire system. Mixing 2700K and 4000K fixtures in the same sightline creates visual discord that undermines even the best design.
3. Hide the Source, Show the Effect
Here’s a rule professional lighting designers live by: you should see the effect of the light, never the light source itself. When you notice glaring fixtures or exposed bulbs, the installation has failed. The fixture should disappear into the landscape while the illumination takes center stage.
This means tucking uplights behind shrubs, recessing well lights into groundcover, and positioning spotlights where they’re screened by foliage or hardscape. It also means concealing all wiring. Visible cables running across a garden bed are a telltale sign of a rushed or careless installation.
When evaluating landscape lighting ideas for your property, always prioritize the illusion over the equipment. The best systems feel effortless because someone spent real time thinking about fixture placement.
Outdoor Lighting Placement Tips That Make or Break a Design

Even the best fixtures fail when placed incorrectly. Landscape lighting placement separates amateur results from professional transformations. Here are the exterior lighting tips that guide every project we design.
4. Uplight Trees From the Right Distance
Tree uplighting creates some of the most dramatic effects in a landscape, but the fixture distance from the trunk makes all the difference. For most trees, position the fixture 12 to 24 inches from the base and angle the beam to catch the canopy without creating a harsh bright spot on the trunk.
Narrow beam angles (10 to 25 degrees) work best for tall, columnar trees like Italian Cypress. Wider angles (36 to 60 degrees) suit spreading canopy trees like oaks and ficus. For larger specimens, use two fixtures at different angles on opposite sides to create depth and eliminate flat, one-dimensional illumination.
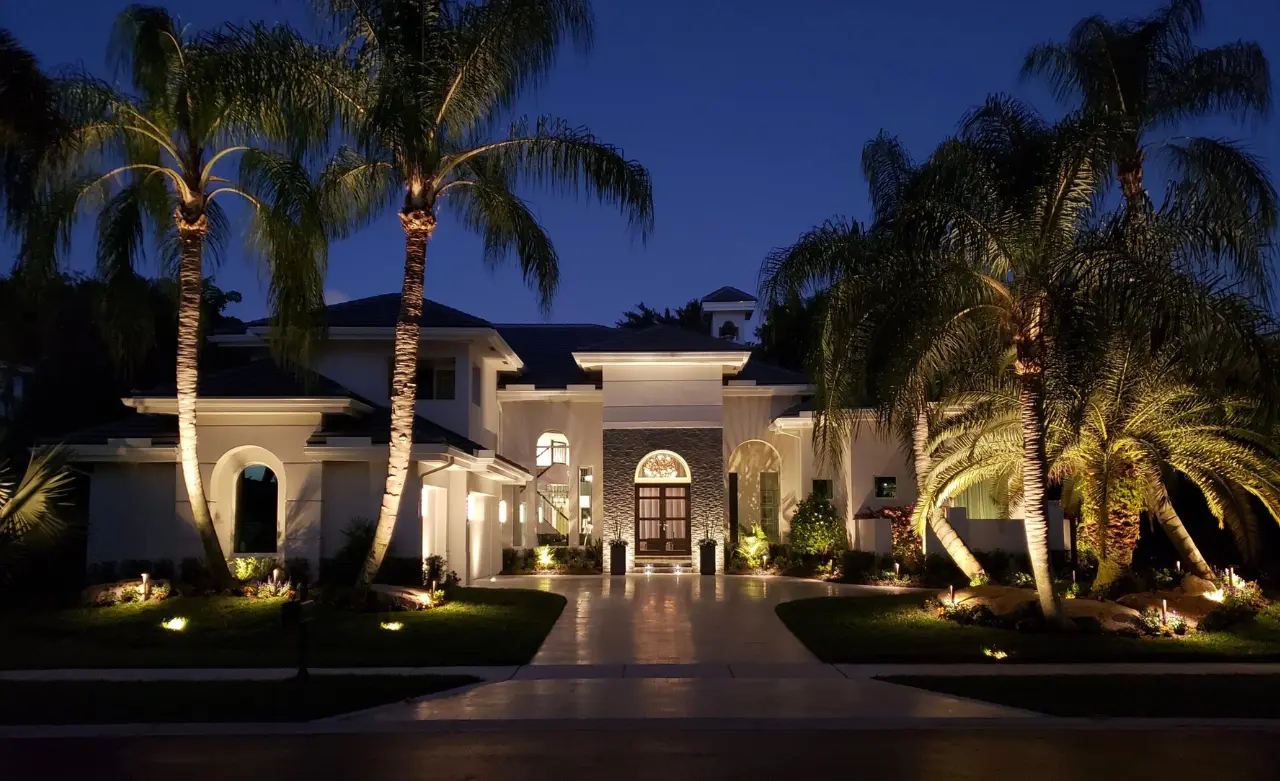
5. Light the Front of House in Layers, Not Floods
When searching for landscape lighting ideas for the front of house, many homeowners default to floodlights that blast the entire facade with even brightness. This is one of the most common outdoor lighting mistakes to avoid.
Instead, approach your home’s front elevation as a composition. Uplight the architectural columns or stone elements. Graze light across textured surfaces like stacked stone or wood siding to reveal their character. Use softer path lights along the walkway, and consider a gentle wash on landscaping beds flanking the entry.
The result should guide the eye naturally from the street to the front door, telling a visual story rather than simply turning on the lights.
6. Create Depth With Shadowing and Silhouetting
Shadows are just as important as light. Two of the most underused techniques in outdoor lighting design are shadowing and silhouetting.
Shadowing involves placing a light in front of a feature (like an ornamental tree) so it casts interesting shadow patterns against a nearby wall. Silhouetting works in reverse: you place the light behind a feature so it’s backlit against a surface, creating a striking dark outline. Both techniques add layers of depth that flat, direct lighting can never achieve.
These are the outdoor lighting design ideas that elevate a system from “good” to “people stop and notice.”
7. Don’t Forget Pathway and Driveway Safety Lighting
Aesthetic lighting gets all the attention, but functional safety lighting is equally critical. Every walkway transition, step change, and driveway curve needs adequate illumination to prevent trips and falls.
The key is making safety lighting feel integrated, not institutional. Low-profile path lights spaced 8 to 10 feet apart provide enough coverage without creating a runway effect. For steps, consider recessed riser lights that wash each tread surface without creating glare for anyone walking up or down.
This is one of those landscape lighting tips that protects your family and your guests while still looking intentional and designed.
Landscape Lighting Ideas for Your Backyard

Backyard lighting has a different purpose than front-of-house design. Here, the priority shifts toward creating an atmosphere for outdoor living, entertaining, and relaxation. These are the outdoor lighting tips that help you get the most from your backyard after dark.
8. Zone Your Backyard Lighting by Activity
Your backyard likely serves multiple purposes: cooking, dining, lounging, swimming, and playing. Each activity benefits from different lighting levels and styles.
Outdoor kitchens and grilling areas need brighter, task-oriented light. Dining areas benefit from softer, warm ambient light. Pool areas need a combination of safety lighting and decorative accents. Lounge spaces perform best with subtle, dimmable fixtures that promote relaxation.
By creating separate lighting zones on independent circuits or smart controls, you can adjust the atmosphere to match the occasion. Go bright and functional for a family barbecue, or dim and intimate for a quiet evening.
9. Use Downlighting (Moonlighting) for Natural Ambiance
Moonlighting is one of the most beautiful techniques in landscape lighting design. Fixtures are mounted high in mature trees and angled downward, casting soft, dappled light that mimics natural moonlight filtering through branches.
The effect is subtle and romantic. It illuminates gathering areas below while creating gentle shadow patterns on the ground. If you have mature trees in your backyard, moonlighting should be one of the first outdoor lighting design tips you explore.
10. Illuminate Water Features Carefully
Pools, fountains, and water features deserve special attention. Light interacts with water in unpredictable ways, and overlighting creates glare on the surface rather than the shimmering effect you’re after.
For pools, underwater LED fixtures in warm white create an inviting glow. For fountains and waterfalls, position lights so they illuminate the moving water from below or behind, emphasizing the motion. Avoid lighting water features from above. The reflection usually creates harsh spots rather than the soft ambiance you want.
5 Outdoor Lighting Mistakes to Avoid
Knowing what not to do is just as valuable as knowing the right approach. These are the most frequent outdoor lighting mistakes to avoid that we see when evaluating existing systems.
11. Overlighting Everything
More light does not mean better lighting. Overlighting is the single most common mistake in residential outdoor lighting, and it’s the one that makes homeowners wonder why their property looks worse at night than their neighbor’s.
Professional landscape lighting relies on restraint. It’s about creating contrast between illuminated areas and shadow. That interplay is what makes a property feel dimensional and interesting. When every surface is blasted with equal brightness, you lose all depth and drama.
As the Illuminating Engineering Society (IES) emphasizes in its guidelines, outdoor lighting should enhance visibility and atmosphere without overpowering the environment. The goal is never to turn night into day.
12. Choosing Cheap Fixtures That Won’t Last
Aluminum and plastic fixtures from big-box stores might look acceptable on day one. By year three, corrosion, UV degradation, and moisture damage turn them into eyesores, or they stop working entirely.
Commercial-grade solid brass fixtures cost more upfront but are engineered to withstand decades of exposure to sun, salt air, irrigation, and soil contact. In Orange County’s coastal climate, this isn’t a luxury. It’s a necessity. The cost difference between a fixture that lasts 3 years and one that lasts 20+ years is the most important investment calculation in landscape lighting.
13. Ignoring Voltage Drop and Wire Sizing
This is the technical detail that separates professional landscape lighting from DIY disasters. Voltage drop occurs when electrical resistance in the wire reduces the voltage reaching fixtures at the end of a run. The result: some fixtures shine brightly while others at the end of the line barely glow.
Proper wire sizing, strategic transformer placement, and calculated circuit design prevent this problem entirely. If your contractor can’t explain their voltage drop calculations, that’s a red flag.
14. Leaving Wiring Exposed or Poorly Buried
Visible wiring running across garden beds and along fence lines is one of the most common complaints we hear from homeowners with existing systems. Beyond being unsightly, exposed wiring is vulnerable to damage from landscapers, pets, and weather.
All low-voltage wiring should be buried at proper depth and routed through protective conduit where it crosses hardscape or high-traffic areas. Clean installation practices take more time, but they’re the difference between a system that looks and performs professionally and one that looks like an afterthought.
15. Skipping a Maintenance Plan
Even the best-designed system needs periodic attention. Plants grow and can block fixture output. Fixture lenses collect dirt and debris. Bulb outputs gradually diminish. Seasonal changes shift how light interacts with your landscape.
Annual professional maintenance, including cleaning lenses, adjusting aim, trimming overgrowth, and checking connections, keeps your system performing at its best. It’s a small investment that protects the much larger investment you’ve already made in your lighting design.
Professional Landscape Lighting vs. DIY: What to Know
Modern low-voltage systems have made landscape lighting more accessible to DIY enthusiasts, and some homeowners enjoy the process. But there’s a meaningful difference between placing a few solar path lights and engineering a comprehensive lighting system for a luxury property.
Professional landscape lighting involves design expertise that accounts for architectural style, sightlines, existing landscaping, electrical load calculations, and long-term system expansion. It requires knowledge of beam angles, lumen output, color rendering, voltage drop management, and the interaction between different fixture types.
For smaller projects like accent lighting in a garden bed or string lights on a patio, DIY can produce great results. For whole-property systems, particularly on high-value homes, the expertise and precision of a professional lighting designer typically delivers dramatically better outcomes and avoids costly mistakes.
Quick-Reference: Outdoor Lighting Tips by Area
| Area | Recommended Approach | Color Temp |
| Front Facade | Layered uplighting on architecture, wall grazing on texture | 2700K |
| Trees & Gardens | Uplights 12 to 24 inches from base, two-point lighting for large specimens | 2700K to 3000K |
| Pathways & Steps | Low-profile path lights 8 to 10 feet apart, recessed step lights | 2700K to 3000K |
| Patio & Dining | Overhead string or downlights, dimmable ambient fixtures | 2700K |
| Pool & Water | Underwater LED, backlit fountains, avoid overlighting surface | 2700K |
| Driveway | Bollards or recessed lights along edges, even spacing | 3000K |
Frequently Asked Questions About Outdoor Lighting
What are the best outdoor lighting tips and tricks for beginners?
Start with a plan before buying any fixtures. Walk your property at night and identify the features you want to highlight and the areas that need functional lighting for safety. Focus on warm color temperatures (2700K to 3000K), use fewer fixtures with intentional placement rather than more fixtures randomly scattered, and always conceal your wiring. If you’re lighting more than a small accent area, consider consulting with a professional for a design that you can then implement in phases.
What are some landscape lighting ideas for the front of my house?
The most impactful approach combines architectural uplighting on your home’s facade with pathway lighting leading to the entry and accent lighting on key landscape features. Graze light across textured surfaces like stone or stucco to reveal depth. Use warm-toned spotlights to uplight flanking trees or tall ornamental plantings. Add subtle wash lighting to garden beds for balance, and install low path lights to guide visitors to the front door. The goal is creating a visual narrative from the street to your entrance.
What are the best landscape lighting ideas for a backyard?
Zone your backyard by activity. Use moonlighting from mature trees for overall ambient light, focused task lighting at cooking and dining areas, and accent uplighting on feature trees, walls, or garden structures. For pools and water features, underwater LED fixtures create an inviting ambiance. String lights work well over dining areas and lounging spaces. Make sure all zones are independently controllable so you can adjust the atmosphere for different occasions.
How much does professional outdoor lighting cost?
Professional landscape lighting costs vary significantly based on property size, design complexity, fixture count, and material quality. A modest front-yard-only system might start around $3,000 to $5,000, while a comprehensive whole-property design with commercial-grade brass fixtures, smart controls, and concealed wiring for a larger home can range from $10,000 to $25,000 or more. The best way to understand costs for your specific property is to schedule a free design consultation where a professional can assess your home and provide a detailed proposal.
How do I know if my outdoor lighting needs a professional or if I can DIY?
If you’re adding a few accent lights in a small garden bed or stringing patio lights, DIY can work well with a basic low-voltage kit. But if you want a cohesive system that covers your entire property, especially on homes valued over $1M, professional design and installation typically deliver better results and better long-term value. Professionals account for voltage drop, fixture selection, design layering, wire sizing, and expansion planning that DIY systems often miss.
What type of fixtures last the longest outdoors?
Commercial-grade solid brass fixtures offer the longest lifespan for outdoor lighting applications. Unlike aluminum or die-cast fixtures that corrode within a few years (particularly in coastal areas like Orange County), brass naturally develops a protective patina and can last 20+ years without structural degradation. Pair brass fixtures with LED lamps rated for 50,000+ hours, and you have a system built for decades of reliable performance.
How often should landscape lighting be maintained?
We recommend a professional maintenance visit at least once per year. During this service, a technician will clean fixture lenses, re-aim lights affected by plant growth, check all electrical connections, replace any failed LEDs, and make seasonal adjustments. Properties with fast-growing landscaping or heavy tree canopies may benefit from semi-annual maintenance to keep everything performing optimally.
Ready to Transform Your Property With Professional Outdoor Lighting?
These outdoor lighting tips represent the principles we apply to every project at Vision Outdoor Lighting. From the initial design concept through installation and long-term maintenance, every decision is guided by a commitment to creating sophisticated, lasting nighttime environments for Orange County homeowners.
If you’re ready to see what professional lighting design can do for your property, we’d love to hear from you. Juan personally handles every consultation, walking your property after dark to understand its unique potential and creating a custom design plan tailored to your home, your landscape, and how you live outdoors.
Schedule Your Free Design Consultation by visiting our contact page or calling us directly at (949) 877-3600.
Explore our landscape lighting resources for more tips and ideas.