Low voltage landscape lighting runs on 12 volts, making it safer and simpler to install than line voltage. Start with a plan and nighttime walk-through, then choose a transformer sized at 80% maximum capacity. Use 12-gauge wire for runs over 50 feet and 14-gauge for shorter distances. Bury wire 6 to 12 inches deep and route through conduit at hardscape crossings. Space path lights 8 to 10 feet apart on alternating sides. Test everything after dark before finalizing positions. DIY works for small projects, but whole-property systems with concealed wiring and voltage drop management benefit significantly from professional installation.
Low voltage landscape lighting is the standard for residential outdoor illumination in Orange County and across the country. Operating at 12 volts instead of 120 volts, these systems present minimal shock hazard, require no licensed electrician for fixture placement, and deliver the warm, controlled illumination that makes properties look their best after dark.
But “simpler than line voltage” does not mean simple. Understanding how to install landscaping lights low voltage means accounting for transformer sizing, wire gauge selection, voltage drop across long runs, proper burial depth, fixture spacing, and connection weatherproofing. Skip any of these steps and the system underperforms, fails prematurely, or both.
This outdoor lighting installation guide walks through every stage of the process. For a broader overview of design principles before installation, start with our outdoor lighting tips guide.
Planning Your Low Voltage Landscape Lighting Layout
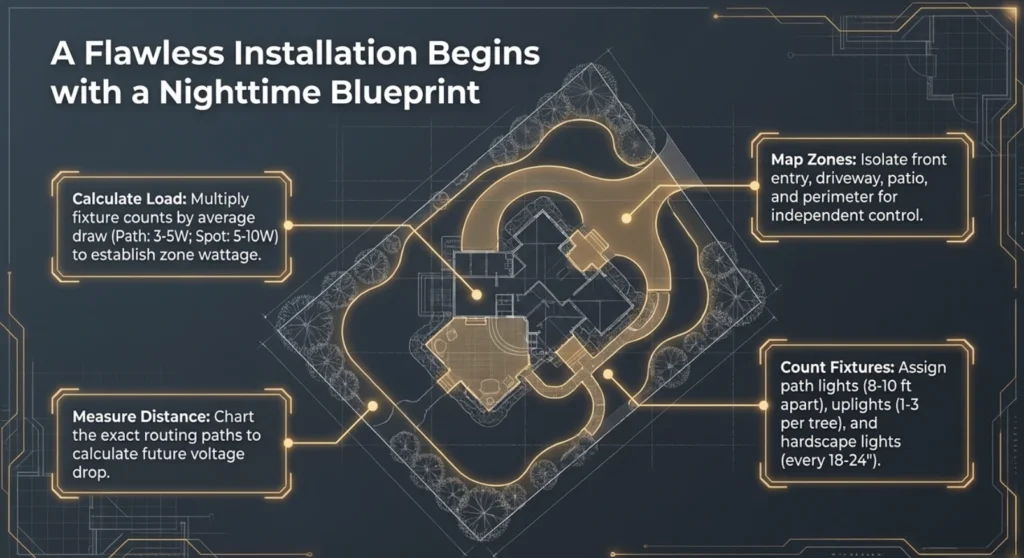
Every successful low voltage landscape lighting installation starts with a plan, not a shopping trip. Before purchasing a single fixture, walk your property after dark and identify what needs lighting.
Map your zones. Divide the property into functional areas: front entry and walkways, driveway, patio and outdoor living, trees and garden accents, perimeter and security. Each zone may require its own transformer circuit for independent control.
Count your fixtures. Estimate the number of fixtures per zone. Path lights every 8 to 10 feet, one to three uplights per tree (depending on size), hardscape lights every 18 to 24 inches under seat walls, and accent spots for architectural features. This count drives your transformer sizing.
Calculate total wattage. Add up the wattage of every planned fixture. A typical LED path light draws 3 to 5 watts. A spotlight draws 5 to 10 watts. Twenty fixtures at an average of 5 watts each equals 100 watts total. This number determines your transformer size.
Measure wire run distances. Walk the actual paths where wire will be routed and measure the distance from the transformer to the furthest fixture in each zone. This distance determines wire gauge and affects voltage drop calculations.
For detailed fixture placement guidance, our outdoor lighting placement guide covers specific distances and angles for every fixture type.
Choosing and Installing Your Transformer
The transformer is the heart of any low voltage system. It converts household 120-volt power to the 12 volts that fixtures operate on. Transformer installation requires a nearby outdoor GFCI-protected outlet, and the unit should be mounted at least 12 inches above grade on a wall, post, or stake.
How to Size Your Transformer
Add up the total wattage of all planned fixtures, then size the transformer at no more than 80% of its rated capacity. This leaves headroom for future expansion and prevents the transformer from running at full load, which shortens its lifespan.
| Total Fixture Wattage | Minimum Transformer Size | Recommended (80% Rule) |
| Up to 80W | 100W | 100W |
| 80 to 120W | 150W | 150W |
| 120 to 240W | 300W | 300W |
| 240 to 480W | 600W | 600W |
| 480W+ | Multiple transformers | Split into zones |
Transformer Placement Tips
Location: Mount near an outdoor GFCI outlet, preferably close to the center of your lighting zones to minimize wire run lengths. Avoid locations where the transformer will be hit by irrigation spray or buried under mulch.
Concealment: Position behind shrubs, inside planting beds, or behind structures where the transformer stays accessible for maintenance but is not visible from primary sight lines. Professional installations prioritize concealment without sacrificing accessibility.
Multi-tap outputs: Quality transformers offer multiple voltage taps (12V, 13V, 14V, 15V). Higher taps compensate for voltage drop on longer wire runs, ensuring fixtures at the end of the line receive adequate power. This feature is essential for larger properties.
Wire Gauge Selection and Voltage Drop Management
Landscape lighting wiring is the technical detail that separates systems that perform consistently from those that dim unevenly or fail prematurely. Voltage drop occurs when electrical resistance in the wire reduces the voltage reaching fixtures at the end of a run. The longer the run and the thinner the wire, the more voltage is lost.
Choosing the Right Wire Gauge
12-gauge wire is the standard for most landscape lighting runs, especially those exceeding 50 feet. It handles higher wattage loads with less voltage drop and provides a thicker, more durable conductor that resists damage from soil contact and landscaping activity.
14-gauge wire works for shorter runs under 50 feet with lower total wattage. It costs less and is easier to work with, but reaches its voltage drop limits quickly on longer distances.
10-gauge wire may be needed for very long runs (100+ feet) or high-wattage circuits. This is common on larger Orange County properties where the transformer sits far from distant lighting zones.
Calculating Voltage Drop
The acceptable voltage drop for low voltage landscape lighting is 10% or less. On a 12-volt system, that means fixtures should receive no less than 10.8 volts. Anything lower causes visible dimming and accelerates LED driver wear.
The basic formula is: Voltage Drop = (2 x Wire Length x Total Watts) / (Cable Constant x Voltage). Cable constants vary by gauge: 12-gauge = 7,500; 14-gauge = 4,750; 10-gauge = 11,920. For a 100-foot run of 12-gauge wire carrying 60 watts at 12 volts: (2 x 100 x 60) / (7,500 x 12) = 0.13 volts, which is well within the acceptable range.
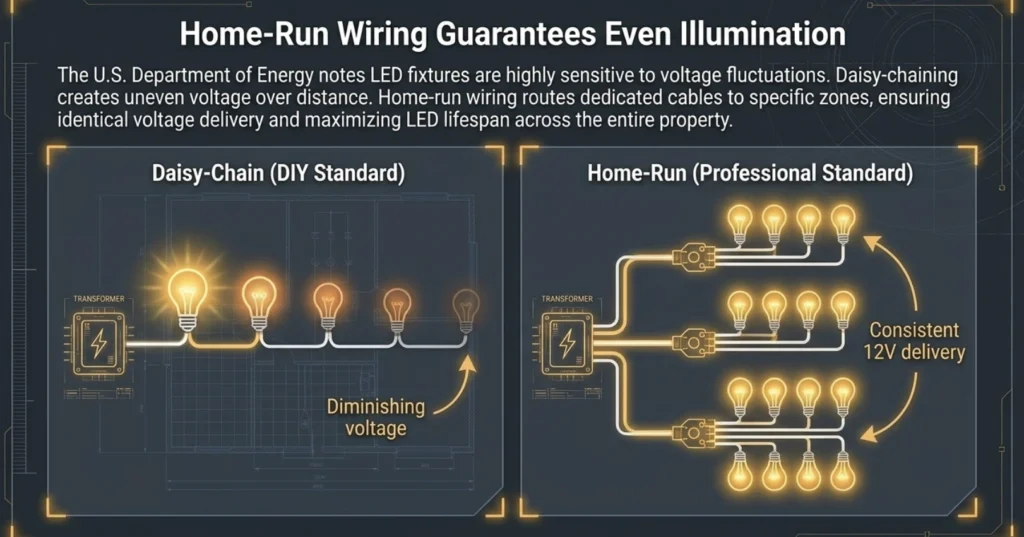
Home-run wiring vs daisy-chain: Home-run wiring routes a dedicated cable from the transformer to each fixture zone, ensuring consistent voltage across all fixtures. Daisy-chain wiring connects fixtures in series along a single cable, which works for short runs but creates uneven voltage on longer ones. Professional installations use home-run configurations for reliable performance. As the U.S. Department of Energy explains, LED fixtures are especially sensitive to voltage fluctuations, making proper wiring design critical for achieving their full rated lifespan.
Trenching, Burying, and Concealing Wire
Wire concealment is one of the biggest differences between DIY landscape lighting and professional results. Exposed cables running across garden beds look messy, create trip hazards, and are vulnerable to damage from landscapers, pets, and weather.
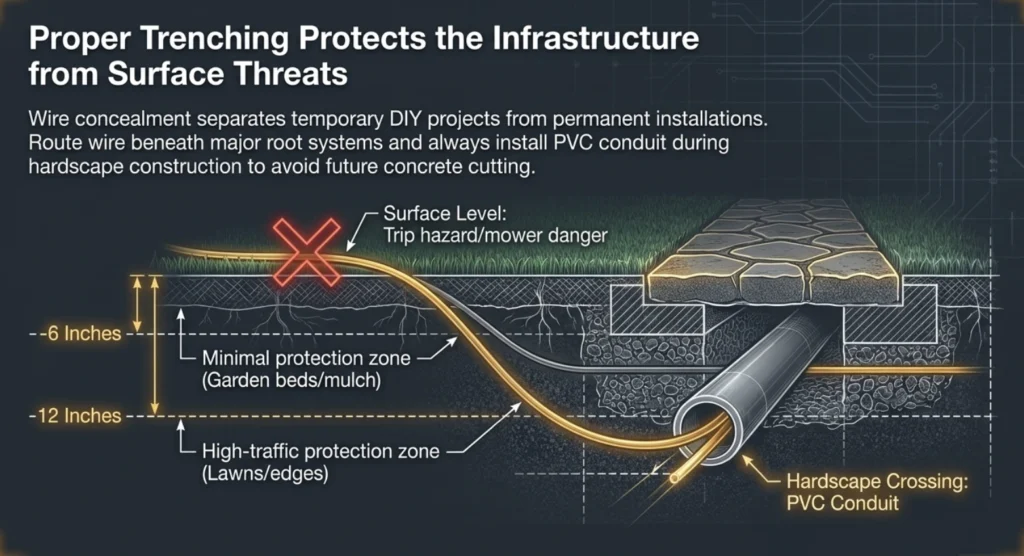
Burial depth: Low voltage landscape lighting wire should be buried 6 to 12 inches deep. Six inches is the minimum for protection against surface disturbance. Twelve inches provides better protection in high-traffic areas and where landscaping equipment is regularly used.
Trenching technique: Use a flat-blade shovel or a trenching tool to create a narrow, clean trench. For lawn areas, cut a slit in the turf, lay the wire at the bottom, and press the turf back into place. For garden beds, bury wire beneath mulch and soil. Route around (never through) major root zones to protect established trees.
Hardscape crossings: Where wire must cross under concrete, pavers, or stone walkways, route it through PVC conduit. Install conduit during hardscape construction if possible. Retrofitting conduit under existing hardscape requires cutting and patching, which is one of the most common reasons homeowners hire professionals for low voltage landscape lighting installation.
Connection weatherproofing: Every wire-to-wire and wire-to-fixture connection must be sealed against moisture. Use silicone-filled wire nuts or waterproof connector strips rated for direct burial. Improperly sealed connections are the leading cause of fixture failure in outdoor lighting systems. Per NEC Article 411, low-voltage lighting systems and components must meet specific installation standards for safe operation.
Installing 12V Landscape Light Fixtures
Path Lights
Insert the ground stake at your marked position, ensuring the fixture stands vertical. Connect the fixture lead wires to the main cable using a waterproof connector. Space path lights 8 to 10 feet apart on alternating sides of the walkway for a natural, staggered pattern. Tighten spacing to 5 to 6 feet at curves, steps, and the final approach to the front entry.
Spotlights and Uplights
Position stake-mounted spotlights 1 to 6 feet from the feature being illuminated (depending on size). Aim at 30 to 45 degrees upward for trees and architecture. For large canopy trees, use two to three fixtures at different angles for dimensional coverage. After connecting wires, test the angle after dark before burying the cable and finalizing the position. For tree-specific guidance, see our guide on the best way to light a tree.
Well Lights and Hardscape Lights
In-ground well lights require a hole dug to accommodate the housing plus a drainage layer of gravel beneath. Set the housing flush with or slightly below grade. Ensure the drain holes are clear and unobstructed. Hardscape lights mount under wall caps, counter overhangs, or stair risers using the manufacturer’s bracket system. Space hardscape lights 18 to 24 inches apart for continuous coverage.
Testing and Troubleshooting Your System
After all fixtures are connected and the transformer is powered on, test the entire system after dark. This is the only way to evaluate light output, beam angles, glare, and overall balance.
Check for even brightness. Walk the property and compare fixture output across each zone. If fixtures at the end of a run appear noticeably dimmer, voltage drop is the issue. Switch to a heavier gauge wire, shorten the run, use a higher tap on the transformer, or split the circuit into two home runs.
Check for glare. Stand at every seating area, window, and entry point. Any fixture that shines into eyes needs repositioning or a glare shield. Glare problems invisible during daytime setup become obvious after dark.
Check connections. If a fixture fails to illuminate, verify the connection at the wire splice. Loose or improperly seated connectors are the most common cause of single-fixture failure.
Adjust aim. Fine-tune spotlight angles after dark when you can see the actual beam pattern on the target surface. A few degrees of adjustment can dramatically change the effect.
Document everything. Record fixture positions, wire routes, transformer settings, and connection points. This documentation saves hours of troubleshooting during future maintenance or expansion. Professional installations always include comprehensive system documentation.
Maintaining Your Low Voltage System
Low voltage systems require less maintenance than many homeowners expect, but they are not maintenance-free. Annual attention keeps the system performing at its best.
Clean fixture lenses once a year to remove dirt, cobwebs, and oxidation that reduce light output. Re-aim fixtures displaced by landscape growth, landscaping activity, or soil shifting. Check wire connections at accessible junction points for corrosion or moisture intrusion. Replace any LED lamps that have dimmed noticeably, typically every 10 to 15 years for quality LEDs. Trim vegetation that has grown to block fixture output or cover solar sensors on timers. For details on LED lifespan expectations, see our guide on how long LED lights last.
DIY Landscape Lighting vs Professional Installation
Low voltage systems are more accessible to DIY installation than line voltage, and capable homeowners can achieve good results on smaller projects. Adding a few path lights to a front walkway, installing string lights on a patio, or placing accent spotlights on a couple of trees are all reasonable DIY projects with basic tools and a low-voltage kit.
Whole-property systems are a different story. When the project involves 20+ fixtures across multiple zones, long wire runs requiring voltage drop calculations, concealed wiring through hardscape, multiple transformer circuits, and precise fixture placement for architectural and tree lighting, the complexity scales quickly. The margin for error on these systems affects both immediate results and long-term reliability.
Professional low voltage landscape lighting installation adds value in several specific areas. Design expertise ensures fixtures are selected and placed for optimal effect, not guesswork. Voltage drop is calculated and managed for every circuit. All wiring is buried at proper depth and routed through conduit at hardscape crossings. Connections are sealed with professional-grade weatherproofing. And the system comes with documentation that makes future service straightforward.
For Orange County homeowners specifically, the combination of year-round sun exposure, occasional Santa Ana winds, and coastal salt air (even several miles inland) means fixture and connection quality has a direct impact on how long the system lasts. Professional installers who use commercial-grade solid brass fixtures and concealed wiring techniques build systems that perform for 20+ years. DIY systems using big-box aluminum fixtures and surface-laid wiring often need significant repair or replacement within 3 to 5 years.
Quick-Reference: Low Voltage Installation Specifications
| Specification | Standard | Notes |
| Operating voltage | 12V AC | Stepped down from 120V via transformer |
| Transformer sizing | 80% max capacity | Leave room for expansion |
| Wire gauge (50+ ft runs) | 12-gauge | Most common for residential |
| Wire gauge (under 50 ft) | 14-gauge | Short runs, lower wattage only |
| Burial depth | 6 to 12 inches | 12 inches near high-traffic areas |
| Voltage drop limit | 10% maximum | Fixtures should receive 10.8V+ |
| Path light spacing | 8 to 10 ft apart, staggered | 5 to 6 ft at curves and steps |
| Hardscape light spacing | 18 to 24 inches | Under caps, risers, overhangs |
| Connection type | Waterproof, direct-burial rated | Silicone-filled wire nuts or strips |
Get Professional Low Voltage Installation for Your Property
This guide covers how to install low voltage landscaping lights for homeowners who want to understand the process, tackle smaller projects, or evaluate the work of a contractor they’re considering hiring. For whole-property systems where design precision, concealed wiring, and long-term performance matter, professional installation delivers results that DIY approaches struggle to match.
For professional low voltage landscape lighting installation with concealed wiring in Newport Beach, Laguna Niguel, Irvine, or anywhere in Orange County, contact Vision Outdoor Lighting or call (949) 877-3600. Every project is owner-led, uses commercial-grade solid brass fixtures, and includes complete system documentation.
Visit our landscape lighting installation page to learn more about the professional process.