Clean solar panels monthly with mild soap and a soft cloth to restore charging efficiency. Replace rechargeable batteries every 1 to 3 years when runtime drops. Restore cloudy lenses with a headlight restoration compound. For stubborn oxidation on panels, use white vinegar or baking soda paste. If solar lights still underperform after full maintenance, the issue is likely a technology limitation, not a cleaning problem. Professional low-voltage landscape lighting delivers consistent brightness every night regardless of weather or season.
Solar landscape lights lose brightness over time as panels accumulate dirt and components wear from continuous outdoor exposure. What starts as convenient, installation-free lighting gradually dims until fixtures barely illuminate pathways.
This guide covers how to clean solar landscape lights to restore performance: solar panel cleaning, lens restoration, battery replacement, and troubleshooting common problems. For Orange County homeowners dealing with dim or failing solar lights, these steps provide practical solutions. While proper solar light maintenance helps maximize output, understanding the inherent limitations of solar technology compared to professional low-voltage systems helps set realistic expectations about what cleaning can and cannot achieve.
Why Solar Landscape Lights Lose Brightness Over Time
Common Causes of Declining Performance
Multiple factors contribute to declining solar light performance, often working together. Dirt, dust, and debris blocking solar panels prevent adequate sunlight from reaching photovoltaic cells. Oxidation and UV damage create cloudy film on panel surfaces. Degraded rechargeable batteries (typical 2 to 3 year lifespan) gradually lose capacity. Cloudy or scratched lenses reduce LED output even when other components function properly.
Corroded electrical connections create resistance that reduces power transfer. Seasonal sun angle changes affect charging, with winter providing less daily energy. As the Department of Energy notes about outdoor solar lighting, operating times in winter months may vary as much as 30% to 50% compared to summer. Orange County’s marine layer further impacts solar charging by reducing direct sunlight during morning hours, and salt air accelerates component degradation in coastal areas.
How Solar Lights Work and Why Maintenance Matters
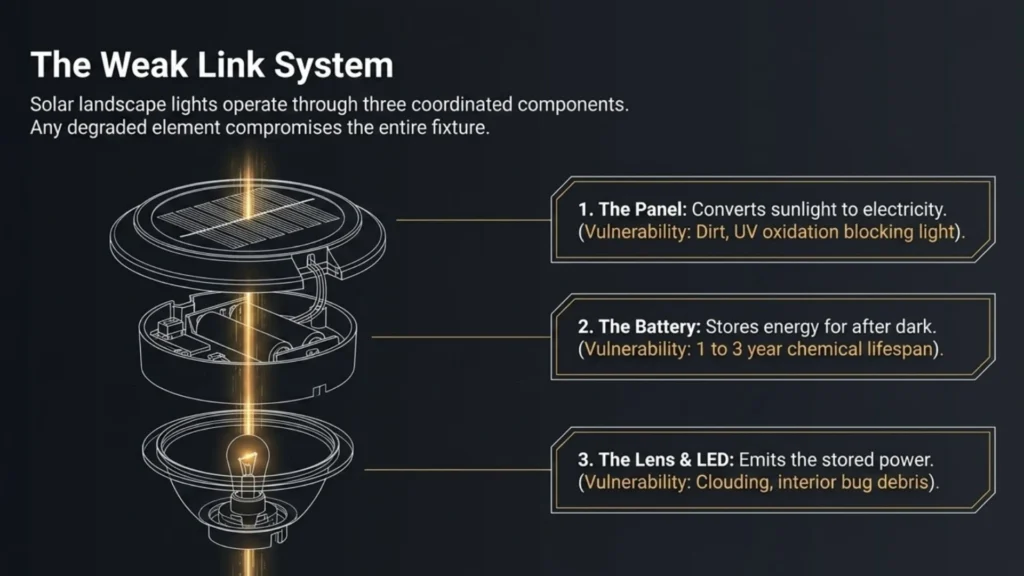
Solar landscape lights operate through three coordinated components. The solar panel converts sunlight to electricity during daylight hours. Rechargeable batteries store this energy for use after dark. LED bulbs activate at dusk using stored power.
System efficiency depends on all components functioning optimally. Dirty solar panels cannot charge batteries fully. Old batteries cannot store adequate power even when panels charge properly. Blocked lenses prevent LED light from reaching intended areas even when batteries hold full charge. Any weak link compromises performance regardless of other components’ condition. For more on benefits and limitations of solar landscape lights, see our detailed comparison guide.
Cleaning Solar Panels to Restore Charging Efficiency
What You Need for Solar Panel Cleaning
Gather appropriate supplies before starting. Soft microfiber cloths or non-abrasive sponges prevent scratching panel surfaces. Mild dish soap and water provides safe, effective cleaning. White vinegar removes stubborn mineral deposits and hard water stains. A soft-bristle brush reaches textured surfaces. Avoid abrasive cleaners, scrubbing pads, or harsh chemicals that damage photovoltaic cells.
Step-by-Step Solar Panel Cleaning Process
Follow this procedure to restore solar panel efficiency safely. Remove fixtures from ground stakes or detach solar panels if possible for easier cleaning. Rinse panels with clean water to remove loose debris. Mix a mild soap solution using a few drops of dish soap per cup of water. Gently wipe the panel surface with a soft cloth using light pressure in circular motions.
For stubborn buildup or mineral deposits, apply white vinegar and let it sit 2 to 3 minutes before wiping. Rinse thoroughly with clean water, ensuring all soap residue is removed. Dry completely with a soft towel to prevent water spots that reduce efficiency. Reinstall fixtures ensuring panels face unobstructed sun exposure throughout the day. The best cleaning time is early morning or late afternoon when panels are cooler.
Removing Oxidation and UV Damage From Solar Panels
Panels exposed to intense sunlight develop oxidation over time, appearing as cloudy white film that reduces transparency and charging efficiency. Signs include a hazed appearance and noticeably reduced clarity compared to new panels. Light abrasive options like baking soda paste or automotive plastic polish can help. Apply with gentle circular motions using a soft cloth, avoiding excessive pressure.
Rinse and dry thoroughly after treatment. Set realistic expectations: severely oxidized panels may not fully restore to original clarity. When panels show extensive degradation that solar panel cleaning cannot improve, replacement becomes more practical than continued restoration attempts.
Cleaning and Restoring Solar Light Lenses
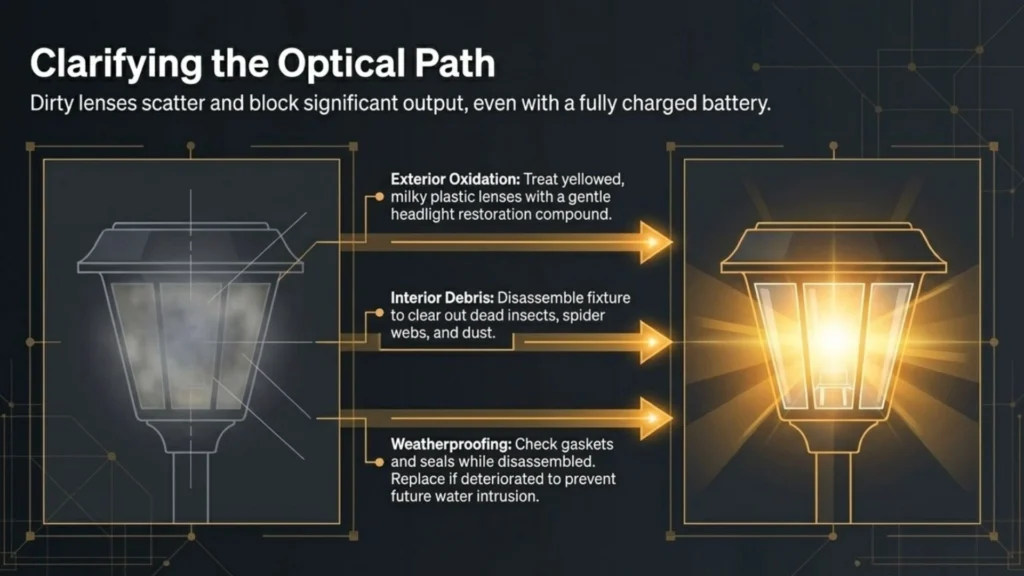
Lens clarity directly affects how much LED light reaches intended areas. Dirty lenses block significant output even when panels charge properly and batteries hold full charge. Oxidation creates a milky appearance that scatters light. Bug debris and spider webs commonly accumulate inside fixtures. UV damage yellows plastic lenses over time.
To clean lenses properly: remove the lens cover or entire fixture head according to manufacturer design. Wash with mild soap and water using a soft cloth. For plastic lens oxidation, apply gentle polish with a headlight restoration compound. Remove interior debris including dead insects and dust. Check gasket and seal condition while the fixture is disassembled, replacing if deteriorated. Dry all components completely before reassembly. This step alone often provides the most immediate visible improvement in restoring dim solar lights.
Maintaining and Replacing Solar Light Batteries
Battery replacement represents inevitable maintenance regardless of how well solar lights are cleaned. Most solar landscape lights use NiMH or NiCd rechargeable batteries with typical lifespans of 1 to 3 years depending on quality and climate. Signs that batteries need replacement include shortened runtime (lights dim within hours of activation), complete lack of illumination despite clean panels, or very dim output even after sunny charging days. Orange County heat accelerates chemical degradation, and coastal humidity promotes internal corrosion.
To replace batteries: locate the compartment (typically at the bottom of fixtures or under the solar panel assembly). Note battery type, size, and voltage specifications before purchasing replacements. Remove old batteries and clean contacts with a dry cloth or fine sandpaper if corrosion is present. Install new batteries matching correct polarity. Reseal the compartment ensuring weatherproof integrity. Allow a full charging cycle of 1 to 2 sunny days before expecting full brightness. For additional troubleshooting steps, see our guide on how to fix solar landscape lights.
Troubleshooting Common Solar Light Problems
Lights not turning on at all. Check if the battery is dead or disconnected. Verify the solar panel is clean and faces unobstructed sun. Test LED functionality by covering the panel completely to simulate darkness and trigger activation. Inspect for corroded connections and water intrusion in the battery compartment.
Dim output or short runtime. This usually indicates a degraded battery as the most common cause. Insufficient daily sun exposure, dirty panels, and aging LEDs also contribute. Seasonal variation plays a role too: shorter winter days provide less charging time. This is where understanding how to make solar lights brighter reaches its practical limits, as battery capacity and solar charging constrain maximum output.
Inconsistent performance between nights. Lights that work some nights but fail others suggest a marginal battery holding minimal charge, inadequate sunlight on cloudy days, loose connections, or moisture in electrical components. A panel partially shaded during critical charging hours also causes intermittent issues.
Seasonal Solar Light Maintenance Schedule
Monthly: Quick wipe of solar panels. Visual inspection for broken fixtures or displaced panels. Remove debris like leaves or mulch around fixtures. Check that panels remain unobstructed by growing plants.
Quarterly: Full solar panel cleaning with soap and water. Lens cleaning and interior inspection for debris. Battery contact cleaning to prevent corrosion. Check all fixtures for physical damage and worn seals. The best timing is before summer and winter when lighting demands change.
Annually: Replace batteries if performance has declined (typically every 1 to 3 years). Assess overall fixture condition. Decide on repair versus replacement for failing units. Evaluate if solar lighting still meets property needs. Consider upgrade options if dissatisfied with solar system reliability or brightness.
Solar vs Low Voltage Landscape Lighting
Understanding the solar vs low voltage landscape lighting comparison helps set realistic expectations about what maintaining outdoor solar lights can achieve versus when upgrading makes more sense.
Low-voltage systems provide consistent bright illumination every night regardless of weather. Solar brightness varies with seasonal changes and daily conditions. Low-voltage offers precise dimming control. Solar output gradually diminishes until battery replacement, then repeats the cycle. Professional low-voltage systems maintain performance for 15 to 20+ years with minimal maintenance. Solar fixtures typically need complete replacement every 3 to 5 years. For details on LED fixture longevity, see our technical guide.
Long-term cost analysis reveals that solar seems inexpensive initially, but ongoing battery replacement, fixture replacement, and maintenance time accumulate. Low-voltage represents a higher initial investment but delivers substantially lower lifetime costs through longevity and reduced upkeep.
When Upgrading From Solar to Low Voltage Makes Sense
Solar lights serve appropriate purposes for temporary installations, supplemental lighting, or situations where wiring is not feasible. But several circumstances favor professional low-voltage systems.
Homeowners frustrated with continuous solar landscape light repair and replacement cycles benefit from permanent solutions. Properties needing consistent, reliable lighting for safety, security, or entertainment exceed solar capabilities. Coastal Orange County properties in Newport Beach and similar communities where salt air rapidly degrades solar components particularly benefit from corrosion-resistant low-voltage fixtures. Property owners wanting professional design, concealed wiring, and commercial-grade brass construction find lasting value in professional landscape lighting installation. For those interested in the DIY route, see our guide on how to install low voltage landscape lights.
Ready to Upgrade to Reliable Low-Voltage Landscape Lighting?
Regular maintenance including cleaning solar panels, replacing batteries, and restoring lenses can extend solar light performance within technology limitations. These steps provide practical value for homeowners committed to maintaining solar systems. However, maintenance cannot overcome inherent constraints of weather-dependent charging, limited brightness, and ongoing component replacement.
For homeowners frustrated with ongoing solar maintenance cycles or seeking consistent professional results, low-voltage landscape lighting delivers superior performance, reliability, and long-term value.
Ready to upgrade from solar to professional low-voltage landscape lighting? Contact Vision Outdoor Lighting or call (949) 877-3600 to discuss permanent lighting solutions for properties in Newport Beach, Irvine, Laguna Niguel, and throughout Orange County.