Use IP65-rated LED strips minimum for sheltered outdoor locations and IP67 or IP68 for exposed or in-ground applications. Power strips with a properly sized 12V or 24V driver (add 20% headroom beyond total wattage). Mount using aluminum channels with diffusers for the cleanest results and best heat dissipation. Inject power every 16 feet (5 meters) on longer runs to prevent voltage drop and dimming. Seal every connection and cut point with waterproof connectors or silicone. For RGB or color changing landscape lights with smart control, professional installation ensures clean wiring, reliable connectivity, and system integration that DIY kits rarely achieve.
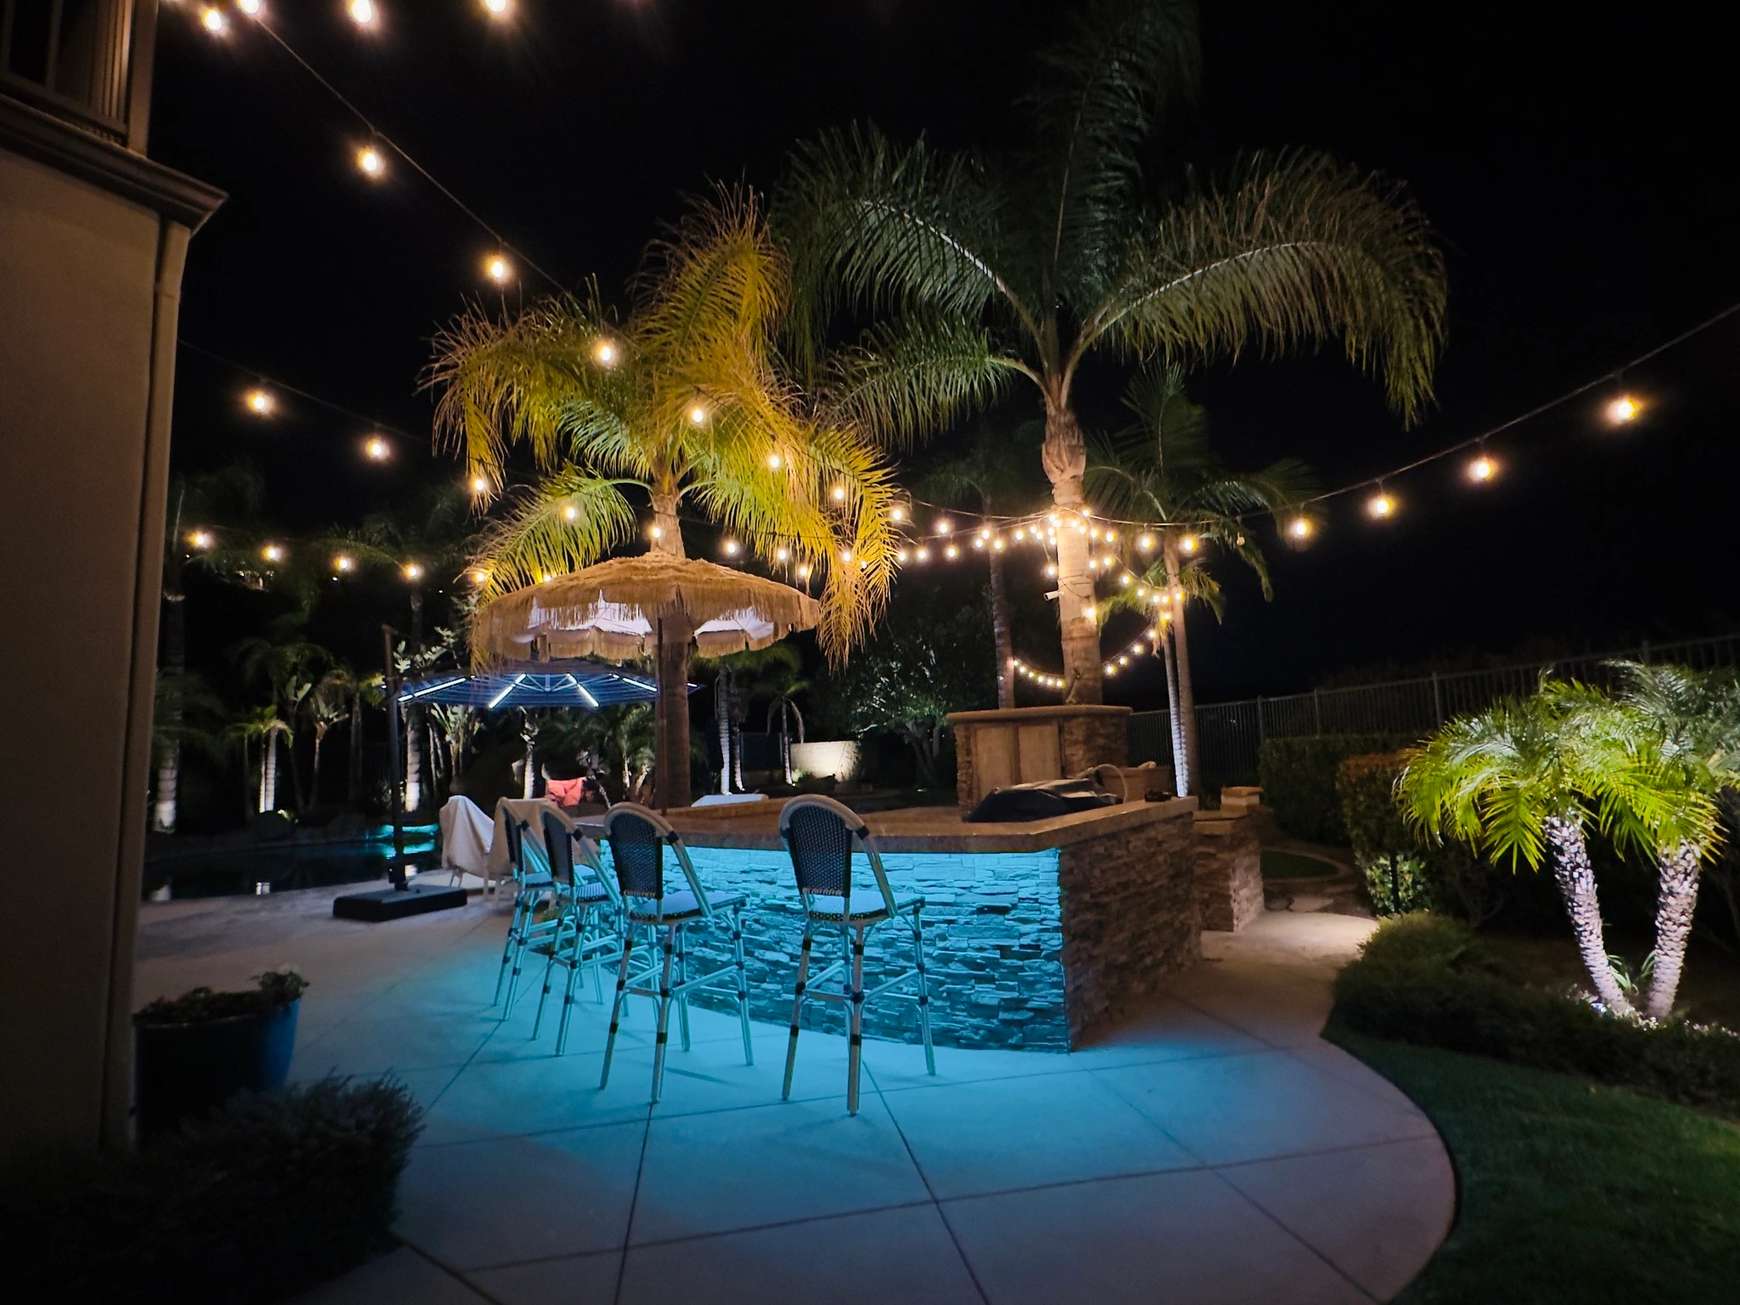
LED strip lights have become one of the most versatile outdoor accent lighting tools available. Tucked under counter overhangs, recessed into stair risers, wrapped along pergola beams, or hidden behind landscape walls, they produce continuous lines of light that no individual fixture can replicate.
But understanding how to install LED strip lights outdoors properly is critical. Indoor LED strips fail within weeks of outdoor exposure. The wrong IP rating, an undersized power supply, exposed connections, or missing power injection on a long run all lead to premature failure, uneven brightness, and frustration. This guide covers the technical requirements that separate installations that last from those that don’t. For more on complementary outdoor lighting approaches, see our deck and patio lighting options.
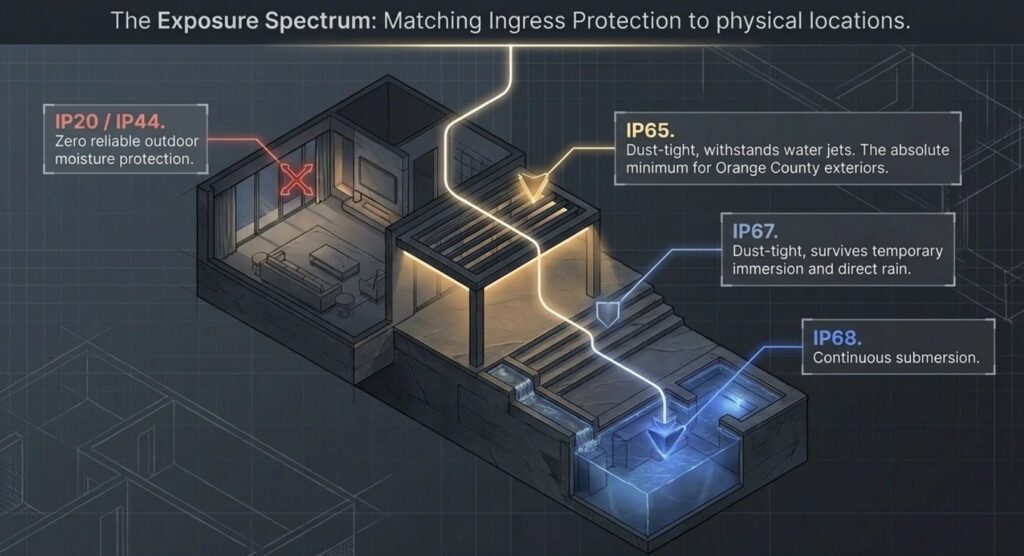
Choosing the Right IP Rating for Outdoor LED Strips
IP (Ingress Protection) ratings are the single most important specification when selecting waterproof LED strips for outdoor use. The two-digit rating tells you exactly how well the strip resists dust (first digit) and moisture (second digit). According to UL Solutions’ outdoor lighting standards, products evaluated for IP ratings undergo specific penetration testing for both moisture and dust resistance.
| IP Rating | Protection Level | Best Use |
| IP20 | No moisture protection | Indoor only, never outdoors |
| IP44 | Splash resistant | Indoor only, not reliable outdoors |
| IP65 | Dust-tight, water jet resistant | Sheltered outdoor (under eaves, pergolas) |
| IP67 | Dust-tight, temporary immersion | Exposed outdoor, direct rain exposure |
| IP68 | Dust-tight, continuous submersion | In-ground, water features, pool areas |
For Orange County outdoor installations, IP65 is the minimum. Strips mounted under sheltered overhangs, inside channels beneath counter edges, or under covered pergola beams can use IP65-rated strips. Anything exposed to direct rain, irrigation spray, or ground-level moisture requires IP67 or IP68. Coastal properties from Newport Beach to Dana Point face additional salt air and humidity that accelerates corrosion on insufficiently rated strips.
Power Supply Selection and Sizing
Matching Voltage and Wattage
LED strips operate on 12V DC or 24V DC, stepped down from household 120V AC through a driver (power supply). The driver must match the strip’s voltage exactly. A 12V strip on a 24V driver burns out immediately. A 24V strip on a 12V driver produces dim, unusable light.
Calculate total wattage by multiplying the strip’s watts-per-foot rating by the total length. A 3W/ft strip running 20 feet equals 60 watts. Size the driver at 120% of this load (72 watts minimum for a 60-watt system) to provide headroom that prevents the driver from running at full capacity, which shortens its lifespan and increases heat output.
For outdoor installations, use a driver rated for outdoor or wet locations. Indoor-rated drivers fail quickly when exposed to temperature swings, humidity, and condensation.
12V vs 24V Systems
12V strips are more common in shorter runs and small projects. They reach voltage drop limits faster, typically requiring power injection every 10 to 16 feet on continuous runs.
24V strips handle longer runs with less voltage drop, making them the better choice for most outdoor LED strip installation projects covering significant distances. They require power injection less frequently and maintain more consistent brightness across the full run.
Managing Voltage Drop on Longer Runs
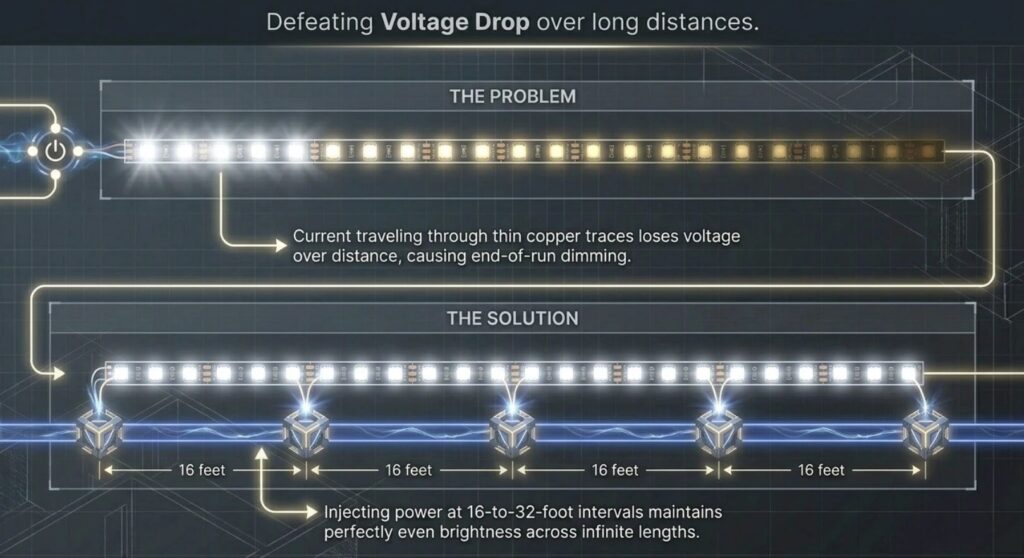
Voltage drop is the most common cause of uneven brightness in outdoor LED strip installations. Current traveling through the thin copper traces on the strip loses voltage over distance. The result: bright LEDs near the power connection and visibly dimmer LEDs at the far end.
Power injection solves this. Instead of feeding power from one end only, inject additional power at intervals along the strip. For 12V strips, inject every 10 to 16 feet. For 24V strips, every 16 to 32 feet depending on wattage density. Run a separate power wire from the driver to each injection point.
Never exceed the manufacturer’s maximum run length. If the spec sheet says 16.4 feet (5 meters) maximum per continuous run, do not daisy-chain beyond that without power injection. Ignoring this is the fastest way to get uneven brightness, excessive heat, and premature LED failure.
Mounting Methods for Outdoor LED Strip Installation
Aluminum Channel Systems
Aluminum channels with diffuser covers produce the cleanest, most professional LED tape light installation results. The channel serves three purposes: it provides a rigid mounting surface that keeps the strip straight, acts as a heat sink that extends LED lifespan by drawing heat away from the diodes, and houses a frosted diffuser that eliminates individual LED dot visibility and creates a smooth, continuous light line.
Channels mount to surfaces using screws, adhesive, or recessed into grooves cut into wood or composite decking. For outdoor use, choose channels with end caps and gaskets rated for moisture exposure. This is the method used in virtually all professional outdoor accent lighting installations.
Adhesive-Only Mounting
Most LED strips have 3M adhesive backing for direct surface mounting. This works indoors but struggles outdoors. Heat cycles, moisture, UV exposure, and gravity cause adhesive to fail within months on most outdoor surfaces. If using adhesive-only mounting outdoors, supplement with mounting clips every 6 to 8 inches and use an adhesion promoter on the mounting surface. Even with these measures, adhesive-only mounting is best treated as a temporary approach.
Recessed and Hidden Mounting
The most polished installations hide the strip entirely so only the light output is visible. Recessed channels routed into stair risers, hidden behind lip edges on seat walls, tucked into counter overhangs, or concealed behind landscape wall caps create the floating-light effect that defines professional color changing landscape lights installations. This approach requires planning during construction or careful retrofit routing, and it is where professional installation delivers results that DIY approaches rarely match.
Weatherproofing Connections and Cut Points
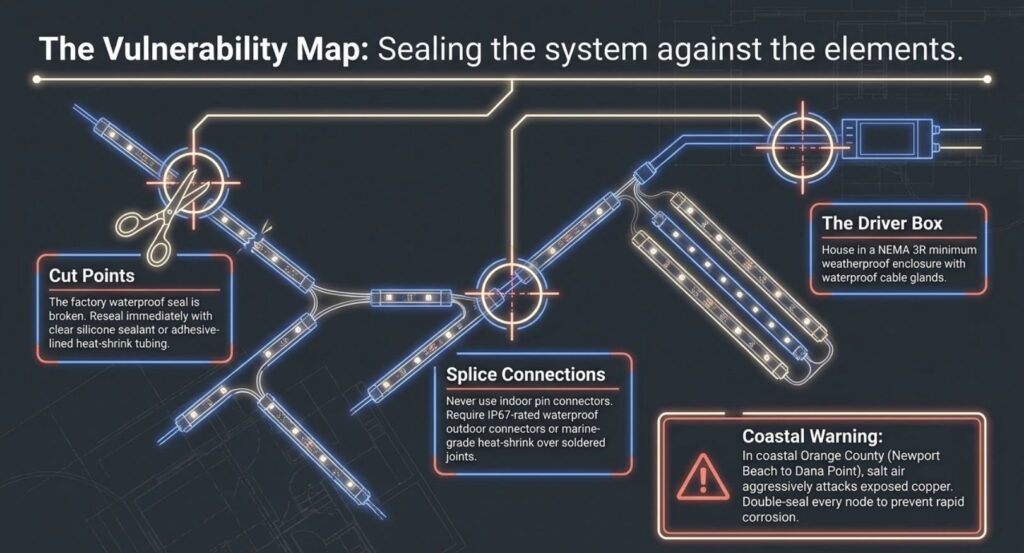
Every cut, splice, and connection point is a potential failure point outdoors. Waterproof LED strips are only waterproof along the uncut strip. The moment you cut to length or splice sections together, you create an exposed entry point for moisture.
At cut points: Apply clear silicone sealant or heat-shrink tubing with adhesive lining to reseal the end. Some manufacturers sell dedicated end caps that snap or slide over cut ends.
At splice connections: Use waterproof connectors rated for outdoor use (IP67 minimum). Avoid standard pin connectors designed for indoor strips. If soldering connections, cover with marine-grade heat-shrink tubing and seal both ends with silicone.
At driver connections: House the driver in a weatherproof junction box (NEMA 3R minimum for outdoor use). Route wire through conduit or weatherproof cable glands. Do not leave drivers exposed to rain, irrigation, or direct sun.
In coastal Orange County, salt air attacks exposed copper and solder joints aggressively. Double-seal every connection and inspect annually for corrosion.
RGB, RGBW, and Smart Control Options
Single-color strips produce one fixed color temperature (typically warm white at 2700K). These are the simplest to install and require only a driver and optional dimmer.
RGB strip lights outdoor systems combine red, green, and blue LEDs to produce millions of color combinations. They require an RGB controller between the driver and the strip. Basic controllers use a remote; advanced systems connect to Wi-Fi or Bluetooth for smartphone control.
RGBW strips add a dedicated white LED alongside the RGB LEDs, producing a cleaner, more natural white than RGB mixing alone. This is the preferred option for installations that need both color effects and warm white ambient lighting.
Smart control integration connects strip lighting to home automation platforms (Google Home, Amazon Alexa, Apple HomeKit). This allows voice control, scheduling, scene presets, and integration with other landscape lighting zones. Professional installations use commercial-grade controllers with reliable connectivity rather than consumer-grade Wi-Fi controllers that drop signals and lose programming.
Step-by-Step Outdoor LED Strip Installation
Step 1: Plan and measure. Map exactly where strips will run. Measure total length needed. Identify power injection points for runs exceeding manufacturer maximums. Locate the driver position and plan wire routes.
Step 2: Select and size components. Choose strips with the correct IP rating, voltage, color type, and wattage. Size the driver at 120% of total load. Order mounting channels, waterproof connectors, and end caps.
Step 3: Mount channels or prepare surfaces. Install aluminum channels along the planned route using screws or adhesive. For recessed installations, route channels into the mounting surface. Ensure channels are straight and level.
Step 4: Install LED strips into channels. Peel adhesive backing and press strips firmly into channels. Cut only at marked cut points. Connect sections using waterproof connectors or solder with heat-shrink sealing.
Step 5: Wire power and controls. Connect driver output to the strip (through controller if using RGB). House the driver in a weatherproof enclosure. Run power injection wires to designated points on longer runs.
Step 6: Seal everything. Apply silicone to cut ends, snap on end caps, verify all connectors are fully seated, and confirm the driver enclosure is sealed.
Step 7: Test. Power on and verify even brightness across the full run. Check all colors if using RGB. Test smart controls and automation scenes. Inspect after dark for any visible hot spots, dim sections, or exposed hardware.
DIY LED Strips vs Professional Installation
Short, simple runs of single-color LED strips under a covered patio or beneath a counter edge are manageable DIY projects. Plug-in drivers, adhesive mounting, and straightforward wiring keep these projects accessible for homeowners comfortable with basic tools. Understanding how to install LED strip lights outdoors at this scale is a matter of following the specifications in this guide and taking time with weatherproofing.
Multi-zone RGB or RGBW systems with smart controls, long runs requiring power injection, recessed or hidden mounting, hardwired electrical connections, and integration with existing landscape lighting are a different level of complexity. Incorrect wiring, undersized drivers, poor weatherproofing, and signal-dropping controllers are common DIY issues that lead to systems underperforming or failing within a year.
Professional outdoor LED strip installation from a company experienced with these systems delivers clean concealed wiring, properly sized and protected power supplies, reliable controller integration, and weatherproofing built for Orange County’s coastal climate. The difference is especially visible on properties where LED strips integrate with broader landscape lighting systems, creating cohesive outdoor environments rather than isolated accent effects. For more on professional systems, explore our outdoor lighting tips resource.
Get Professional Color-Changing LED Strip Lighting
This guide covers how to install LED strip lights outdoors for homeowners who want to understand the process and tackle simpler projects. For professional color-changing LED strip lighting installation with concealed wiring, smart control integration, and weatherproofing built for coastal conditions, contact Vision Outdoor Lighting or call (949) 877-3600. Every project is owner-led, uses commercial-grade components, and includes complete system documentation.