Most solar landscape light problems come down to three things: dead batteries, dirty solar panels, or corroded connections. Replace rechargeable batteries every 1 to 3 years (this is the single most common fix). Clean panels monthly with mild soap and a soft cloth. Check for water intrusion and corroded terminals if lights fail completely. Solar lights under two years old are usually worth repairing. Older fixtures with multiple failing components are better replaced, and homeowners frustrated with ongoing solar maintenance should consider upgrading to low-voltage landscape lighting for consistent, long-term performance.
Solar landscape lights are popular because they’re easy to install and require no wiring. But that convenience comes with a tradeoff: they need regular maintenance to keep working, and most will eventually fail regardless of how well they’re maintained. The good news is that many common problems have simple fixes that can restore performance in minutes.
If your solar lights have gone dim, stopped turning on, or only work some nights, this guide covers how to fix solar landscape lights with practical repair steps. From solar light battery replacement to solar panel cleaning and full troubleshooting, these are the same diagnostic steps that help determine what’s fixable and what’s reached the end of life.
For a deeper dive into ongoing upkeep, see our companion guide on how to clean solar landscape lights.
Why Solar Landscape Lights Stop Working
Before fixing solar landscape lights, it helps to understand what’s going wrong. Most failures fall into a handful of categories.
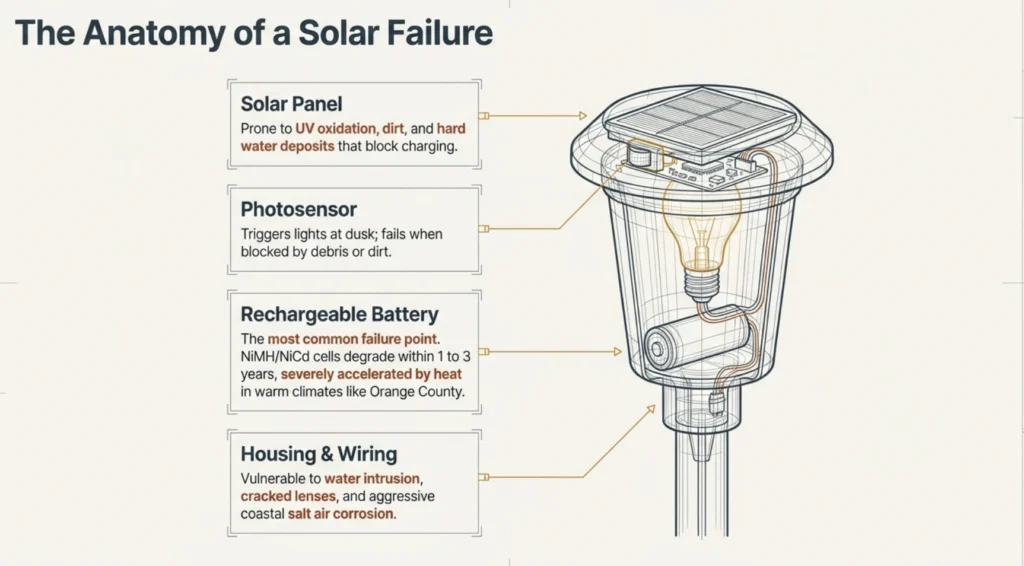
Dead or degraded batteries. This is the number one cause of solar light failure. Rechargeable NiMH and NiCd batteries lose capacity over time, typically lasting 1 to 3 years before they can no longer hold a meaningful charge. As Battery University explains, NiMH batteries are particularly sensitive to heat, which accelerates degradation in warm climates like Orange County.
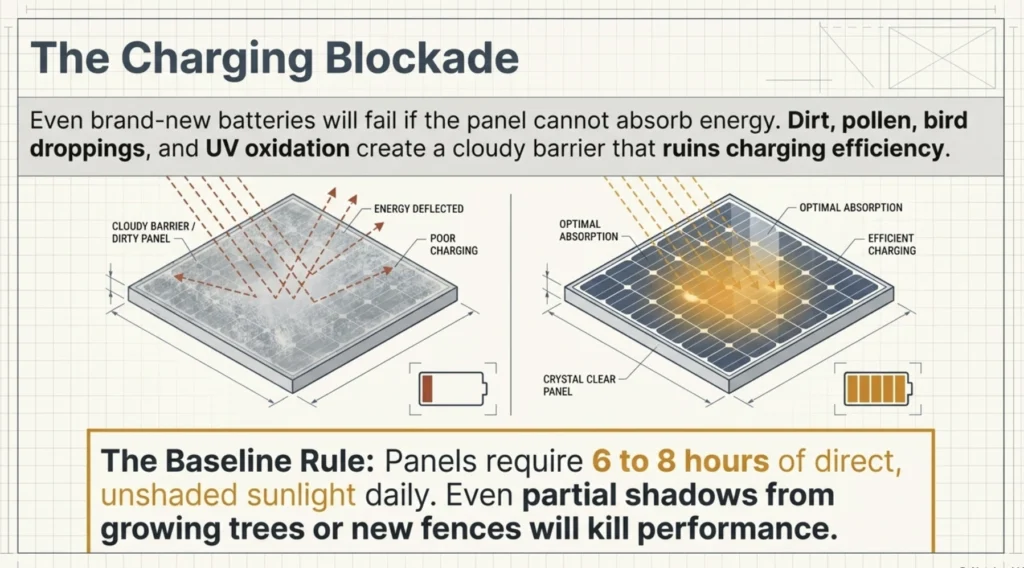
Dirty or oxidized solar panels. Dust, pollen, bird droppings, and hard water deposits block sunlight from reaching the photovoltaic cells. Over time, UV exposure causes oxidation that creates a cloudy film on the panel surface, reducing charging efficiency even on sunny days.
Corroded connections. Moisture that enters the battery compartment or wiring connections creates corrosion that interrupts electrical flow. Coastal Orange County’s salt air speeds this process significantly compared to inland areas.
Cloudy or damaged lenses. Even when the charging system works fine, yellowed or dirty lenses block LED output and make lights appear dim or barely functional.
Sensor malfunction. The photosensor that triggers lights at dusk can fail or become blocked by dirt, causing lights to stay off even in darkness.
Solar lighting performance depends on adequate sunlight reaching the panels. Insufficient battery charging from shading, debris, or seasonal changes not only affects brightness but can also reduce battery lifespan over time.
Solar Light Battery Replacement: The Most Common Fix
If your solar lights are dim, die within a few hours of activation, or have stopped working entirely after two or more years of use, start with the batteries. Solar light battery replacement solves the majority of performance problems.
Step 1: Locate the battery compartment. This is typically at the bottom of the fixture, under the solar panel assembly, or inside the fixture housing. Some models require unscrewing the top; others have a twist-off battery cap.
Step 2: Note the battery type before purchasing replacements. Most solar landscape lights use AA or AAA NiMH rechargeable batteries, but voltage and capacity (measured in mAh) vary. Match the specifications exactly.
Step 3: Remove old batteries and inspect the contacts. If you see white or green buildup on the terminals, clean them with a dry cloth or lightly sand with fine-grit sandpaper until the metal is bright and clean.
Step 4: Install new batteries matching the correct polarity (+ and – markings inside the compartment). Reseal the compartment, ensuring any rubber gasket or O-ring is properly seated to maintain weatherproofing.
Step 5: Allow 1 to 2 full sunny days of charging before evaluating performance. New batteries need initial conditioning to reach full capacity.
Pro tip: Use quality name-brand NiMH batteries rated at 1,000 mAh or higher. Cheap replacement batteries from discount retailers often have lower actual capacity than advertised and degrade faster.
Solar Panel Cleaning to Restore Charging
If batteries are relatively new and lights still underperform, dirty panels are the likely culprit. Solar panel cleaning is the second most effective repair after battery replacement.
Wipe panels with a soft microfiber cloth dampened with mild soap and water. For stubborn mineral deposits or hard water stains, apply white vinegar and let it sit for 2 to 3 minutes before wiping clean. Rinse thoroughly and dry with a soft towel.
For panels with cloudy oxidation (a white haze that doesn’t wipe away with soap), use baking soda paste or automotive plastic polish applied with gentle circular motions. This can improve transparency, though severely oxidized panels may never fully restore to original clarity.
After cleaning, verify that panels receive direct sunlight for at least 6 to 8 hours daily. Trees, eaves, fences, and neighboring structures that have grown or been built since installation can cast shadows during critical charging hours. Even partial shading during peak sun hours significantly reduces charging efficiency.
Troubleshooting Solar Lights That Still Don’t Work After Cleaning
If new batteries and clean panels don’t resolve the problem, work through these additional checks when troubleshooting solar lights.
Test the photosensor. Cover the solar panel completely with your hand or a piece of tape to simulate darkness. If the light activates, the sensor works. If it doesn’t, the sensor may be faulty or blocked by dirt. Clean the sensor area and test again.
Check for water intrusion. Open the battery compartment and look for moisture, condensation, or visible water damage on the circuit board. If water has entered, dry all components thoroughly and check that gaskets and seals are intact. Cracked housings that allow water entry typically mean the fixture needs replacement.
Inspect the LED. LEDs rarely fail before other components, but it does happen. If the battery holds charge, the panel charges properly, and the sensor triggers, a dead LED is the remaining possibility. Most solar fixtures don’t have replaceable LEDs, making this a fixture-replacement scenario.
Examine wiring and solder joints. On fixtures with separate panels and light heads, check the connecting wire for breaks, fraying, or corrosion at solder points. Damaged wiring can sometimes be repaired with weatherproof electrical tape or heat-shrink tubing, but corroded solder joints generally mean the fixture has reached end of life.
When to Repair Solar Lights vs Replace Them
Not every failing solar light is worth fixing. Here’s a practical framework for deciding.
Repair makes sense when: The fixture is less than two years old. Only the batteries need replacement. The housing, panel, and LED are intact. A simple cleaning restores performance. The fixture cost more than $15 to $20 per unit originally, making the repair effort worthwhile.
Replace the fixture when: Multiple components have failed simultaneously (battery plus panel plus lens). The housing is cracked, warped, or corroded beyond cleaning. The solar panel has severe oxidation that no amount of polishing can improve. The fixture is more than 3 to 5 years old with steadily declining performance. The cost of quality replacement batteries approaches the cost of a new fixture.
For Orange County homeowners cycling through their second or third round of solar light repair and replacement, the pattern itself becomes the problem. Solar fixtures are designed as consumable products with built-in obsolescence. Each replacement cycle costs money and time while delivering the same inconsistent performance.
When Upgrading to Low-Voltage Landscape Lighting Makes More Sense
Solar lights serve a purpose for temporary installations, rental properties, or supplemental accent lighting where wiring isn’t feasible. But for homeowners who depend on landscape lighting for safety, curb appeal, or outdoor entertaining, the limitations of solar technology create ongoing frustration that no amount of solar light repair can fully resolve.
| Factor | Solar | Low-Voltage |
| Brightness | Variable, weather-dependent | Consistent every night |
| Battery replacement | Every 1 to 3 years | Not applicable |
| Fixture lifespan | 3 to 5 years typical | 15 to 20+ years |
| Maintenance | Monthly cleaning, regular repairs | Minimal annual upkeep |
| Coastal durability | Salt air degrades quickly | Brass resists corrosion 20+ years |
| Dimming/control | Not available | Full zone and dimming control |
The long-term cost comparison often surprises homeowners. A set of 10 solar path lights at $30 each ($300 initial) replaced every 3 years over 15 years totals $1,500 plus maintenance time. A professional low-voltage system with commercial-grade brass fixtures lasts the full 15 years with minimal upkeep. The initial investment is higher, but the lifetime cost is often lower while delivering dramatically better performance every night.
Ready to Upgrade to Professional Landscape Lighting?
Fixing solar landscape lights is a practical skill, and these repair steps can extend the life of fixtures that still have useful service ahead. But for homeowners who find themselves in a repeated cycle of cleaning, replacing batteries, and swapping out failed units, the question shifts from “how do I fix this?” to “is there a better solution?”
Professional low-voltage landscape lighting delivers consistent brightness, commercial-grade durability, and design precision that solar systems cannot match. For properties in Newport Beach, Irvine, Laguna Niguel, and across Orange County, low-voltage systems are built to perform for decades in coastal conditions.
Ready to upgrade from solar to professional landscape lighting? Contact Vision Outdoor Lighting or call (949) 877-3600 to discuss low-voltage systems for your property.