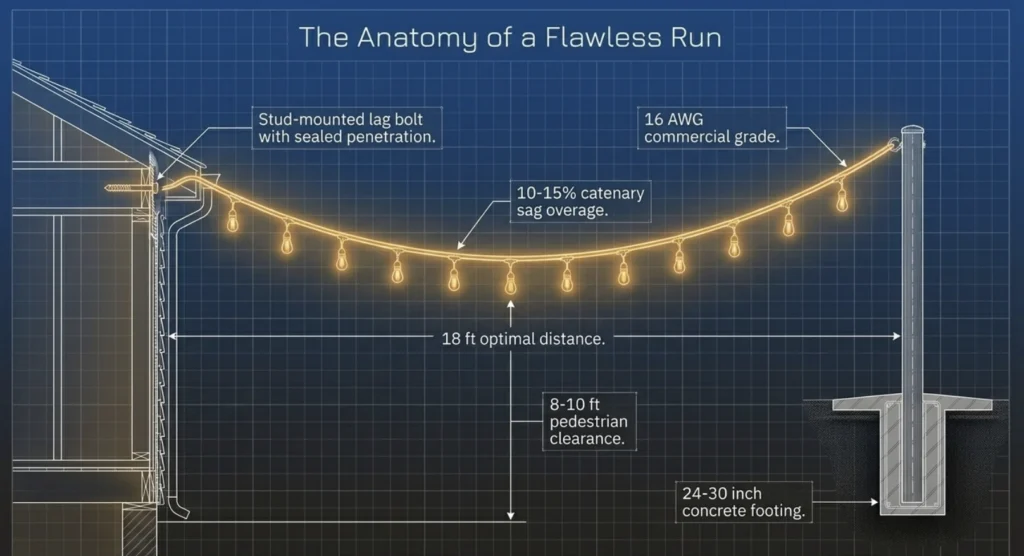
Space support poles or mounting points 15 to 25 feet apart using 4×4 treated posts or galvanized metal poles set in concrete footings 24 to 30 inches deep. Hang lights at 8 to 10 feet above grade for comfortable clearance. Use commercial-grade LED string lights rated for outdoor use with 16 AWG minimum wire gauge. All outdoor circuits require GFCI protection. For temporary plug-in setups, capable DIYers can handle the job. For permanent installations with concealed wiring, hardwired connections, and code-compliant electrical work, professional installation delivers better results and avoids costly mistakes.
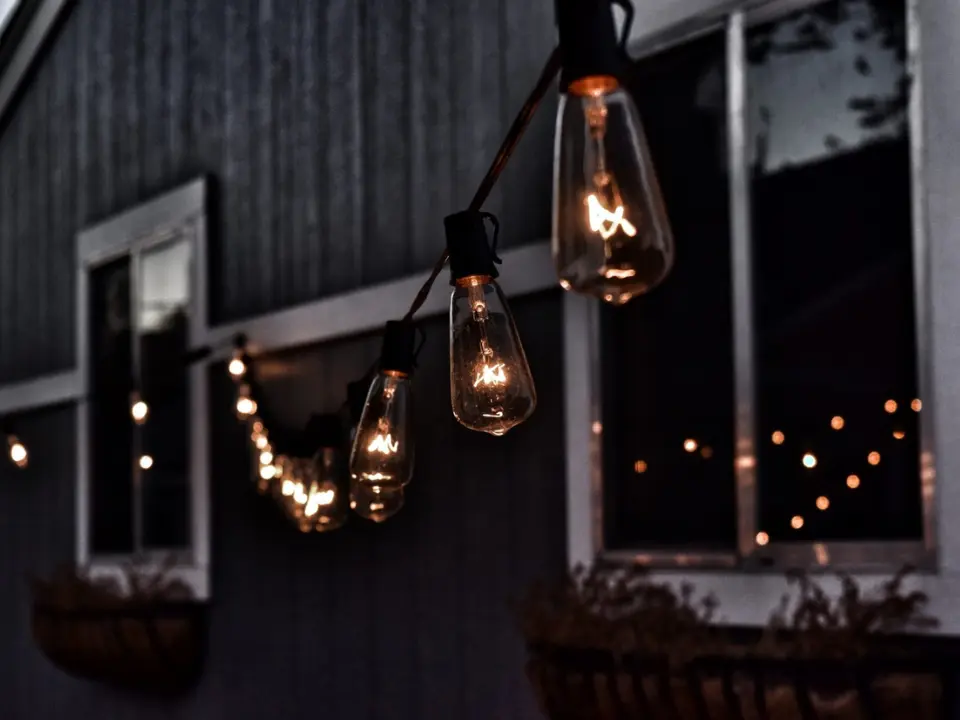
String lights turn ordinary backyards into outdoor living rooms. The warm glow over a dining table, the soft ambiance across a seating area, the way a plain yard suddenly feels like a destination after dark. It’s one of the most requested outdoor lighting upgrades across Orange County, from Newport Beach patios to Irvine backyards to Laguna Niguel entertaining spaces.
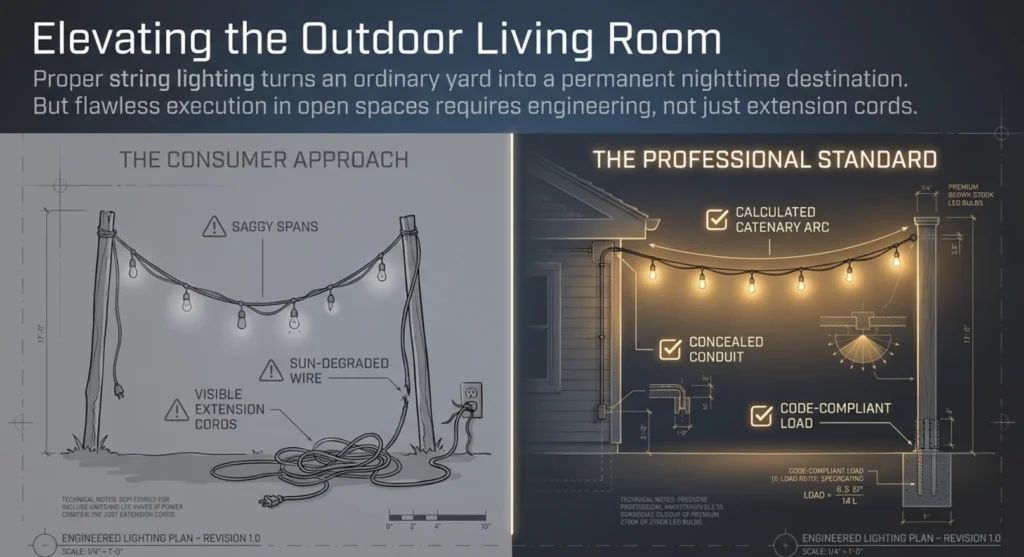
But learning how to hang string lights in a backyard properly, especially in open spaces without existing structures, involves more than draping a strand between two hooks. Pole installation, catenary sag, electrical load, wire gauge, weatherproofing, and code compliance all factor in. This guide covers the full backyard string lights installation process so the result looks professional and lasts. For covered patio installations, see our guide to patio and outdoor living string lights.
Planning Your Backyard String Light Layout
Assessing Your Space and Mounting Points
Start by identifying primary use areas: dining zones, conversation areas, pool surrounds, or general entertaining space. Note existing structures that could serve as anchor points, including the house wall, fence posts, mature trees, pergolas, or garage walls. Measure the distances between potential mounting points and evaluate where electrical outlets or power sources are located.
Consider sight lines from inside the home and from neighboring properties. String lights mounted too low obstruct views. Lights aimed poorly create glare from indoor seating areas. Walk the space at night before finalizing your plan and note any existing light sources that will interact with your new installation.
Temporary vs Permanent String Light Installation
Temporary systems use removable poles, shepherd hooks, or tension-mounted hardware designed for seasonal use. They plug into existing outdoor outlets and can be taken down for storage. This approach works well for renters, seasonal entertainers, or homeowners testing a layout before committing to a permanent system.
Permanent string light installation involves installed poles set in concrete, structure-mounted hardware, hardwired electrical connections, and concealed wiring. These systems stay up year-round, perform in all weather conditions, and deliver the polished look that defines professional outdoor string lighting ideas. Permanent installations in Orange County may require electrical permits for hardwired circuits.
String Light Spacing and the Catenary Curve
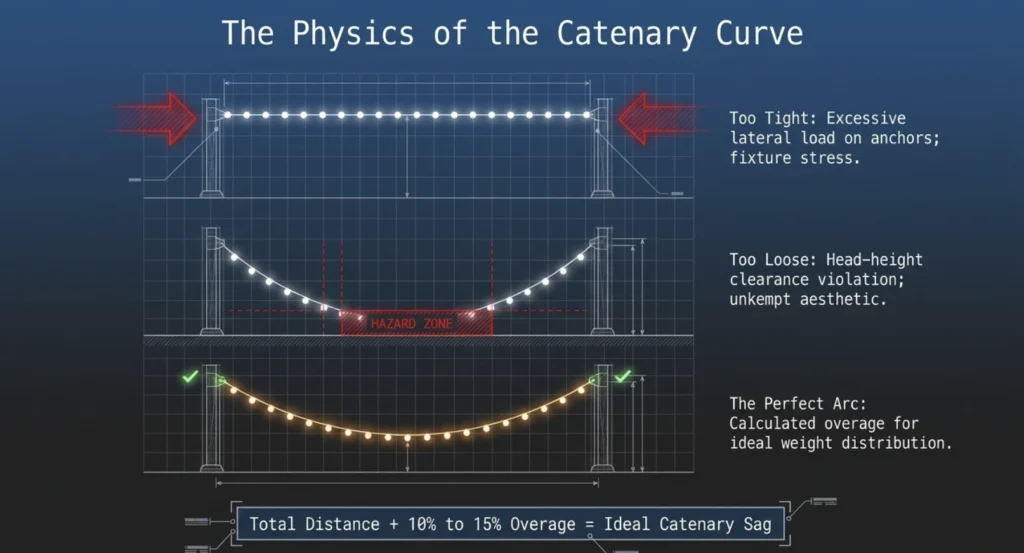
The catenary curve is the natural arc that string lights form between support points. Getting this right is the difference between a professional look and a sloppy one.
Space support points (poles or mounting hardware) 15 to 25 feet apart for residential installations. Closer spacing creates tighter lines with less sag. Wider spacing creates deeper curves that feel more relaxed. For most backyards, 18 to 20 feet between supports produces a balanced look. Too tight puts excessive tension on fixtures and supports. Too loose drops lights into head-height range and looks unkempt.
Calculate total string length by adding approximately 10% to 15% extra beyond the measured distance between mounting points. This accounts for the catenary sag and connection slack at each support. For a 60-foot run across three poles, plan for roughly 66 to 69 feet of string lights.
String Light Mounting Options for Open Backyards
Freestanding String Light Poles for Backyard Installation
String light poles for backyard spaces are the most common solution when no existing structures are available. Use 4×4 treated wood posts or galvanized steel poles, standing 8 to 10 feet above grade for comfortable clearance beneath the lights.
For permanent installations, dig holes 24 to 30 inches deep and 10 to 12 inches in diameter. Set the pole plumb using a level, fill with concrete, and slope the top of the concrete slightly away from the pole for drainage. Allow 24 to 48 hours of curing time before attaching string lights or applying tension. Install eye hooks or mounting brackets at the top of each pole before setting them in concrete (much easier than drilling at height after the fact).
For temporary setups, weighted pole bases or surface-mounted sleeves allow seasonal installation and removal without permanent concrete footings.
Mounting to Existing Structures
Using existing structures saves time and money. Mount to the house using lag bolts driven into studs or solid blocking (never into siding alone). Seal penetrations with exterior caulk to prevent moisture intrusion. Fence posts can serve as mounting points but may need reinforcement to handle the lateral tension load from string lights. Pergolas and arbors have natural mounting points at beams and posts.
For trees, avoid nails and screws that damage bark and create entry points for disease. Use wide straps or non-invasive mounting brackets designed for arborist-safe installation. Keep in mind that trees grow and shift, so tree-mounted lights need periodic adjustment.
Most hanging patio string lights installations use a hybrid approach: one end mounted to the house or an existing structure, with freestanding poles carrying the run across the open yard. This minimizes pole count while maintaining the layout you want.
Choosing String Lights, Hardware, and Materials
String Light Selection
Commercial-grade string lights with shatter-resistant LED bulbs are the standard for any installation meant to last more than one season. Consumer-grade lights from big-box stores use thinner wire, cheaper sockets, and bulbs that yellow and fail within months of outdoor exposure.
Choose lights with 16 AWG wire minimum for outdoor use (14 AWG for longer runs). Socket spacing of 12 to 24 inches is standard. Warm white LEDs in the 2700K range produce the most inviting atmosphere. As the U.S. Department of Energy notes, LED bulbs use up to 75% less energy than incandescent options and last significantly longer, making them the clear choice for both temporary and permanent bistro lights installation.
Mounting Hardware and Electrical Materials
For poles: 4×4 treated posts or metal poles, concrete mix, eye hooks or mounting brackets, and turnbuckles for tension adjustment. For structure mounting: lag bolts, weatherproof anchors, and cable guides. For electrical: a GFCI-protected outdoor outlet (or weatherproof outlet box for hardwired systems), outdoor-rated extension cord or direct-burial wire, weatherproof wire nuts, and a timer or smart switch for automated control.
Electrical Requirements for Backyard String Lights
Calculate total system wattage before installing anything. A standard 15-amp residential circuit handles 1,800 watts maximum, but the 80% continuous load rule means practical capacity is 1,440 watts. Most LED string light systems fall well within this limit, but verify before connecting multiple strands.
All outdoor lighting circuits require GFCI (Ground Fault Circuit Interrupter) protection. If your existing outlet lacks GFCI, a GFCI-protected replacement outlet is a straightforward upgrade. Per the National Electrical Code, outdoor receptacles and wiring must meet specific installation standards for weather protection and ground fault protection.
Plug-in systems are the simplest approach: connect directly to an existing GFCI outdoor outlet using a weatherproof-rated cord. This works for temporary and semi-permanent installations with short runs from the power source.
Hardwired systems connect directly to a dedicated circuit through buried conduit and weatherproof junction boxes. This eliminates visible cords, provides cleaner aesthetics, and creates a truly permanent installation. Hardwired systems in California typically require an electrical permit and may need inspection. This is where how to install cafe lights outdoors crosses from DIY territory into work that benefits from a licensed electrician or professional installer.
Step-by-Step Backyard String Light Installation
Step 1: Mark pole locations and verify spacing. Lay out your plan on the ground using stakes or spray paint. Confirm distances match your string light length calculations including catenary sag allowance.
Step 2: Install support poles. Dig holes 24 to 30 inches deep. Set poles plumb. Fill with concrete. Allow 24 to 48 hours to cure before hanging lights.
Step 3: Install mounting hardware. Attach eye hooks, brackets, or cable guides at the top of each pole and at every structure-mounted anchor point. Ensure hardware is rated for the tension load.
Step 4: Run the string lights. Start at the power source end. Walk each strand to the next support point, maintaining even catenary sag. Use turnbuckles at one or both ends for tension adjustment.
Step 5: Make electrical connections. For plug-in systems, connect to the GFCI outlet. For hardwired systems, make all connections in approved junction boxes with power off at the breaker. Weatherproof every connection point.
Step 6: Test after dark. Power on the system and evaluate brightness, sag, clearance, and overall appearance from every angle including from inside the house. Adjust tension and aim as needed.
Step 7: Document your installation. Record pole locations, string lengths, electrical connections, and any hardware specifications. This makes future maintenance and bulb replacement straightforward.
Maintaining Backyard String Lights in Coastal Orange County
Replace failed bulbs promptly (LED reduces frequency significantly). Clean fixtures annually to remove salt residue, dirt, and cobweb buildup. Inspect mounting hardware and connections for corrosion, especially on properties near the coast. Check turnbuckle tension seasonally, as temperature changes can cause slight expansion and contraction in wire. Trim tree growth that encroaches on light strings. For more on fixture longevity, see our guide on how long LED lights last.
DIY String Lights vs Professional Installation
Temporary plug-in string light setups are well within DIY capability for homeowners comfortable with a post-hole digger and a ladder. Removable poles, shepherd hooks, and plug-in connections keep the project manageable and reversible.
Permanent installations shift the equation. Concealed wiring, hardwired electrical connections, code-compliant conduit runs, proper pole footings in hardscape, and integration with existing landscape lighting all add complexity that affects both the immediate result and long-term reliability. Professional string lighting installation eliminates visible cords, ensures code compliance, and delivers the polished, permanent look that makes backyard spaces feel finished rather than improvised.
For Newport Beach and Irvine homeowners in particular, where outdoor entertaining is year-round and property standards are high, professional installation is the approach that matches the investment these properties represent.
Quick-Reference: Backyard String Light Specifications
| Specification | Recommended | Notes |
| Pole spacing | 15 to 25 ft apart | 18 to 20 ft typical for residential |
| Pole height | 8 to 10 ft above grade | 10 ft for walkway crossings |
| Footing depth | 24 to 30 inches | Concrete, slope top for drainage |
| Wire gauge | 16 AWG minimum | 14 AWG for longer runs |
| Color temperature | 2700K warm white | Most inviting for entertaining |
| Circuit capacity | 1,440W usable (80% rule) | GFCI protection required |
| String length overage | 10 to 15% extra | Accounts for catenary sag |
| Socket spacing | 12 to 24 inches | Closer spacing = denser light |
Get Professional String Lighting for Your Backyard
This guide covers how to hang string lights in a backyard for homeowners ready to take on the project or evaluate what a professional installation involves. For permanent systems with concealed wiring, code-compliant electrical work, and the kind of finished look that matches Orange County’s best outdoor living spaces, professional installation is the path that delivers.
For professional string lighting installation with concealed wiring in Newport Beach, Laguna Niguel, Irvine, or anywhere in Orange County, contact Vision Outdoor Lighting or call (949) 877-3600. Every project is owner-led and built to last.