Professional outdoor lighting design follows the three-layer approach: ambient lighting for safety, task lighting for function, and accent lighting for drama. Start with a nighttime property walk-through, not a fixture shopping cart. Space path lights 8 to 12 feet apart, position tree uplights 2 to 5 feet from trunks, and use warm white LEDs (2700K to 3000K) across every fixture. Commercial-grade solid brass construction lasts 20+ years in Orange County’s coastal climate. The biggest design mistake is over-lighting. Restraint, balance, and purpose should drive every placement decision.
A well-designed landscape lighting system does something remarkable to an Orange County property after dark. Architectural features gain depth. Mature trees become living sculptures. Outdoor living spaces feel as inviting at 9 PM as they do at noon. But none of this happens by accident, and it certainly does not happen by scattering fixtures across a yard and hoping for the best.
Designing effective outdoor lighting is a process that demands the same rigor as any architectural or landscape design decision. This outdoor lighting design guide covers every step: design principles, property assessment, zone planning, fixture selection, technical specifications, and common mistakes that derail even well-intentioned projects.
For homeowners in Newport Beach, Irvine, Laguna Niguel, Coto de Caza, and throughout Orange County who want professional results from their landscape lighting, the planning phase is where excellence begins.
Understanding Professional Outdoor Lighting Design Principles
The Three-Layer Lighting Approach
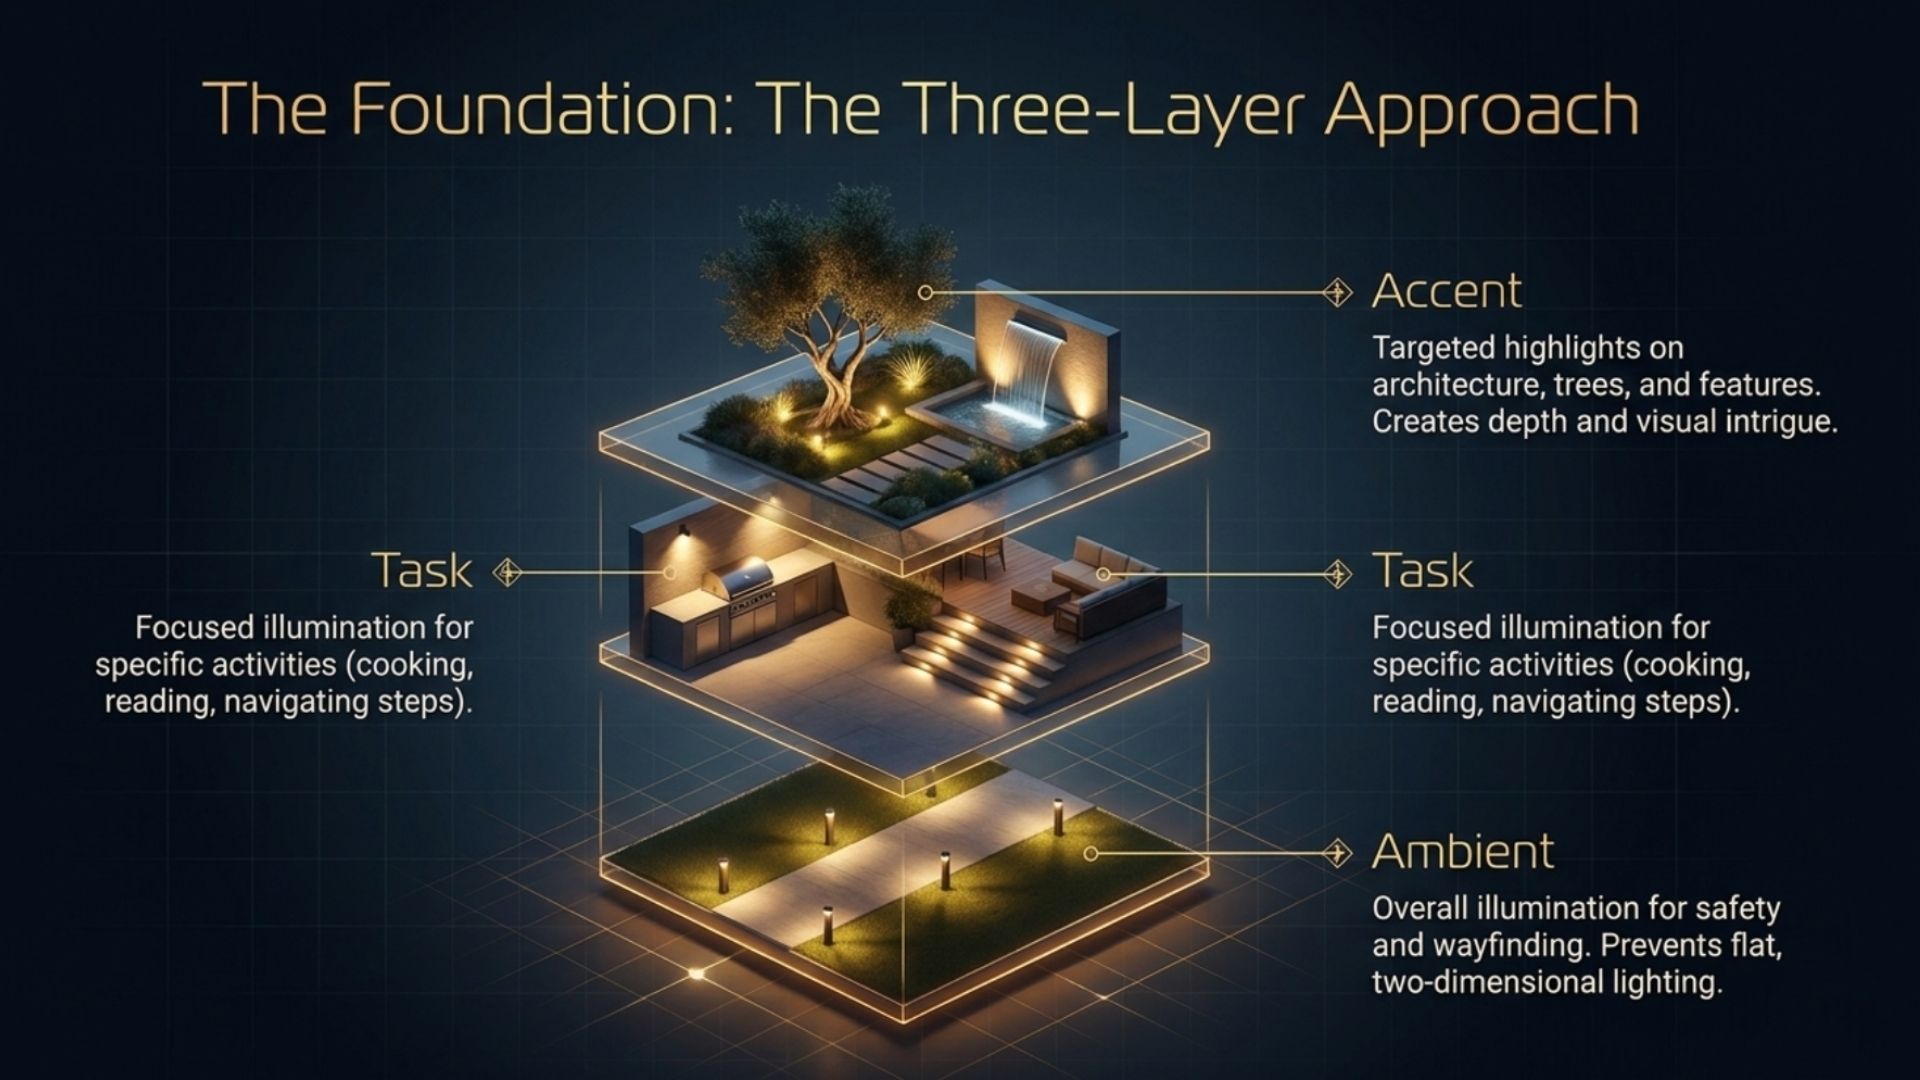
The foundation of every professional lighting design is the three-layer approach. This landscape lighting design process separates outdoor illumination into three distinct types, each serving a specific purpose while working together to create depth, functionality, and visual interest.
Ambient lighting provides overall illumination for safety and wayfinding. Path lights, bollards, and area lights fall into this category. Task lighting delivers focused illumination for specific activities: cooking at an outdoor kitchen, reading on a patio, navigating a staircase. Accent lighting creates visual drama by highlighting specific features like trees, architectural details, water features, and garden focal points.
The common mistake is relying on one type. All ambient lighting creates flat, two-dimensional illumination. All accent lighting without functional support means beautiful features but unsafe walkways. The three-layer approach balances all three, creating systems that are simultaneously functional, safe, and visually compelling.
Balance, Restraint, and Purpose in Lighting Design
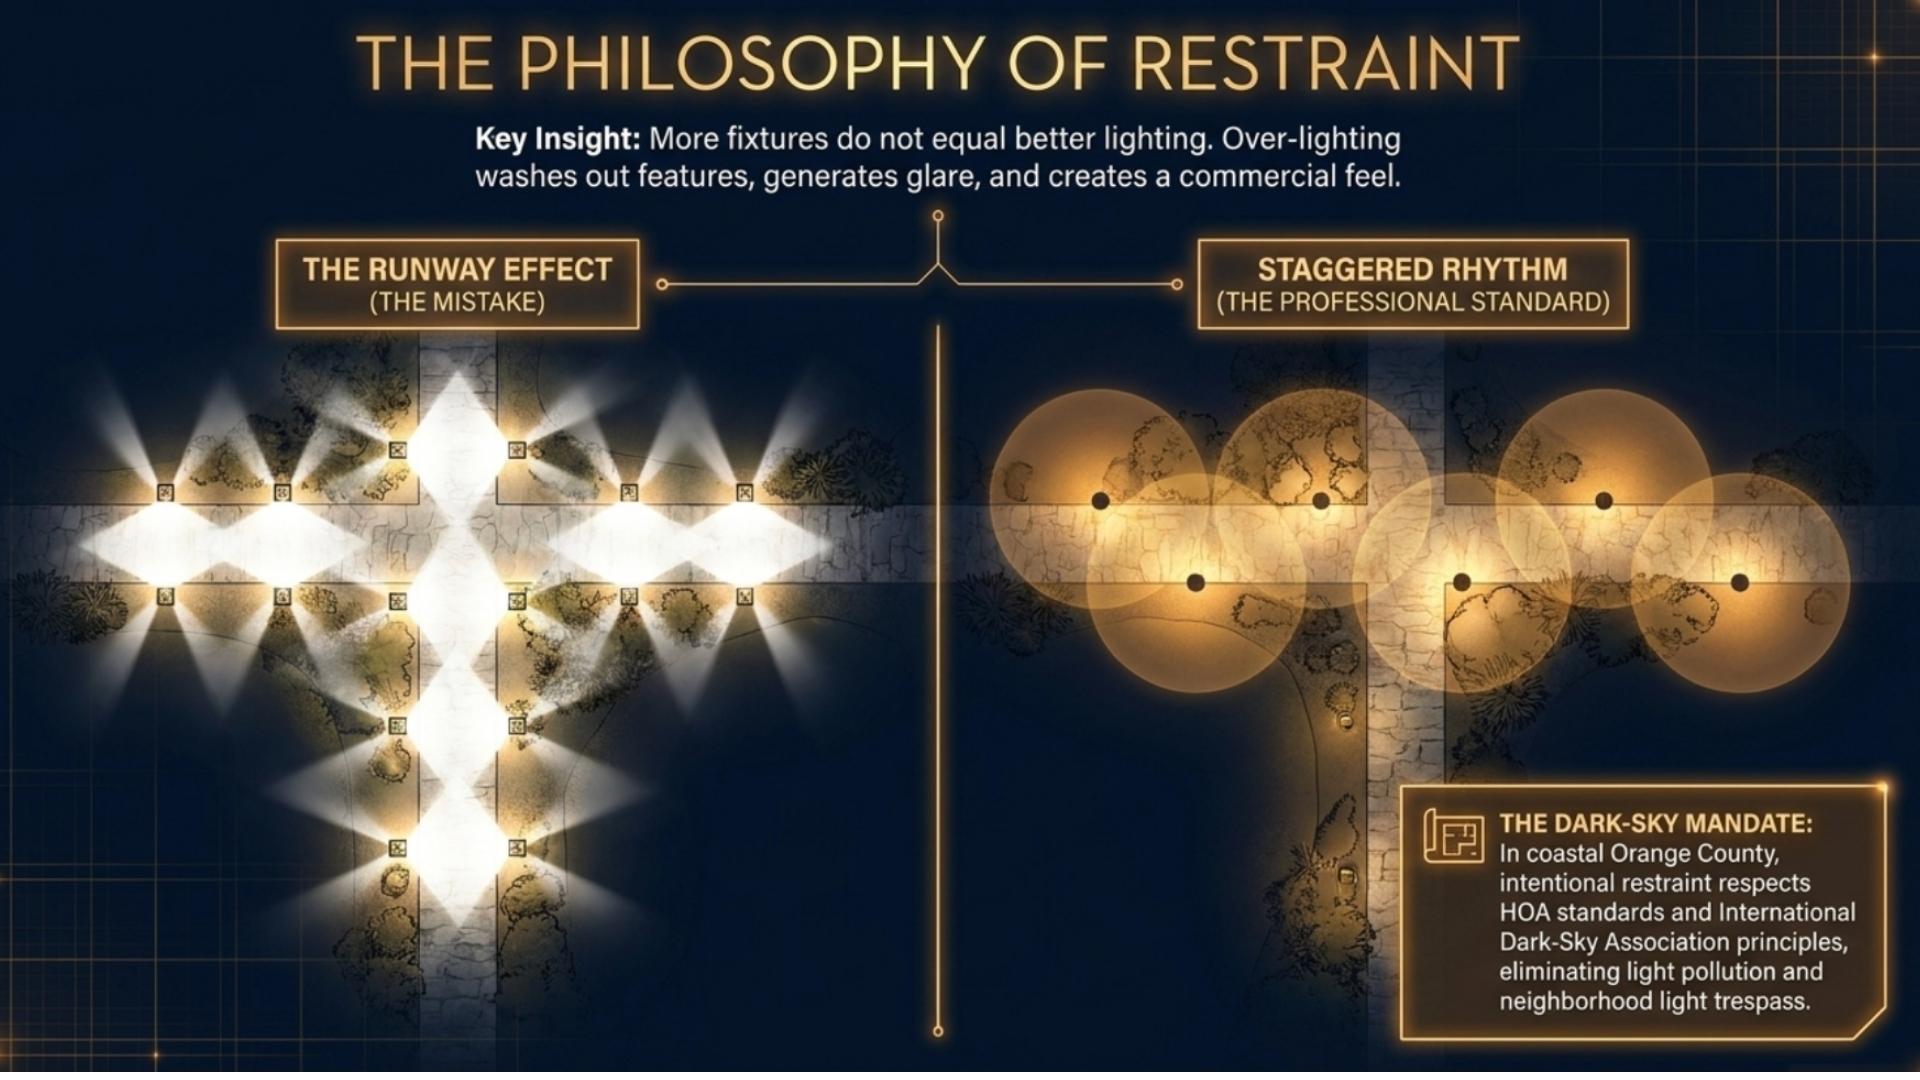
The most important outdoor lighting design principle is also the hardest for DIY installers to embrace: restraint. More fixtures do not create better lighting. Over-lighting is one of the fastest ways to ruin an otherwise beautiful property.
Every fixture must serve a specific purpose. The goal is balance, distributing light evenly across the landscape without hot spots or dark voids. Strategic illumination draws the eye through the space, creating a sense of journey and discovery rather than overwhelming brightness.
Over-lighting creates light pollution, washes out features, and generates glare that makes spaces feel commercial rather than residential. In coastal Orange County communities, the International Dark-Sky Association lighting principles provide valuable guidance on respecting the natural nighttime environment while maintaining safety and aesthetics. HOA restrictions in gated communities like Coto de Caza and Shady Canyon often reinforce these standards.
Establishing Clear Design Intent Before Fixture Selection
Defining goals before selecting a single fixture prevents the most expensive design mistakes. What does the property need? Safety along walkways and steps. Curb appeal that enhances the home’s architecture. Functional light for outdoor cooking and dining. Dramatic accent lighting on specimen trees and garden features. Flexibility for seasonal entertaining.
Long-term maintenance and expansion should factor into every decision. A landscape lighting design plan that accounts for future additions saves significant cost compared to retrofitting a system that was not designed for growth.
How to Assess Your Property Before Designing Outdoor Lighting
Nighttime Property Walk-Through
The most critical step in learning how to design outdoor lighting happens after dark. Walk the property at night to identify current conditions, dark zones, safety concerns, and opportunities that no daytime analysis can reveal.
Document pathways that become hazardous after sunset. Note entry areas that feel unwelcoming. Observe existing light sources from neighboring properties, as street lights and adjacent home lighting impact the design. Photograph current nighttime conditions for documentation. Consider seasonal variations, particularly for deciduous trees whose canopy density changes throughout the year.
Identifying Architectural and Landscape Features Worth Highlighting
Not every feature needs illumination. Identifying what to light is as important as recognizing what to leave in shadow. Architectural details like stone facades, columns, and arches reveal beautiful texture when properly grazed with light. Mature specimen trees with interesting trunk structure or canopy shapes are natural candidates for tree and garden lighting services. Water features, sculptures, and hardscape walls add dimension when thoughtfully illuminated.
The principle of screening versus highlighting guides every decision. Utility areas, HVAC equipment, and less attractive views should recede into darkness. Selective illumination directs focus toward the property’s best assets. Consider sight lines from inside the home. A living room window should frame a beautifully lit garden, not glare from an exposed fixture.
Noting Existing Electrical Infrastructure
Understanding current power availability guides system planning. Locate exterior electrical outlets and junction boxes. Identify potential transformer locations that offer maintenance access while remaining concealed. Note distances from power to the furthest planned fixtures, as this directly affects wire gauge selection and voltage drop calculations.
California building codes and Orange County permitting requirements govern outdoor electrical installations. Per the National Electrical Code outdoor lighting requirements, any line-voltage work requires a licensed electrician. Low-voltage landscape lighting offers more flexibility but still demands proper installation standards to ensure safety and longevity.
Creating Functional Lighting Zones for Your Property
Entry and Approach Zones
The arrival experience sets the tone. Entry lighting must balance safety with welcoming aesthetics, guiding visitors from street to front door without creating a harsh runway effect. Driveway approach lighting should provide clear definition without overlighting. Staggered path lights at 8 to 10 foot intervals create natural rhythm. Front walkway illumination combines safety with ambiance.
Entry lighting at the front door should provide adequate illumination for key operation, package visibility, and face recognition without harsh shadows. Ensure the house number is clearly illuminated and readable from the street for emergency service access.
Outdoor Living Areas and Entertaining Spaces
Extending indoor comfort outdoors requires thoughtful design for deck and patio lighting zones. Task lighting over outdoor kitchens and dining surfaces ensures safe food preparation. Ambient lighting in conversation zones creates comfortable background illumination without harsh brightness.
Orange County’s year-round outdoor living climate means these spaces see constant use. Pool and spa areas need balanced illumination that combines safety with atmosphere. Dimming and zone control add flexibility for different occasions, from bright family gatherings to quiet evening relaxation.
Landscape Focal Points and Accent Lighting
Accent lighting zones create the visual depth that separates professional designs from amateur installations. Outdoor accent lighting on specimen trees, garden beds, water features, and architectural details adds layers of interest that make properties feel dynamic rather than flat.
Tree lighting zones require decisions between uplighting (dramatic, from below) and moonlighting (soft and natural, from canopy). These are the outdoor lighting design ideas that create the most visual impact per fixture. Garden bed illumination should be subtle, with fixtures screened by plantings. Water features benefit from underwater or behind-the-feature lighting that emphasizes movement.
Perimeter and Security Lighting
Security lighting should integrate with the design aesthetic rather than override it. Motion-activated fixtures at key entry points provide security without constant harsh illumination. Property boundary lighting can use subtle fixtures rather than commercial floods. Light trespass creates neighbor conflict and often violates HOA guidelines in communities like Coto de Caza, Newport Coast, and Shady Canyon.
Selecting the Right Outdoor Lighting Fixtures for Each Application
Path and Walkway Lights
Path light styles should complement home architecture. Traditional homes pair with classic lantern-style fixtures. Modern properties benefit from clean-lined contemporary designs. Shorter fixtures (12 to 18 inches) provide subtle guidance. Taller fixtures (24 to 30 inches) cast broader light pools and make more of a design statement.
Material quality determines longevity. Commercial-grade brass and copper fixtures withstand decades of use in coastal environments. Aluminum and plastic alternatives corrode, discolor, and fail within years. In Orange County’s salt air, the difference is dramatic. Spacing guidelines call for fixtures every 8 to 12 feet along straight paths, with tighter intervals at curves, steps, and decision points.
Uplighting for Trees and Architectural Features
In-ground well lights provide clean installations invisible during daytime. Adjustable spotlights on stakes offer flexibility for seasonal adjustment. Beam angles must match canopy sizes: narrow spots (10 to 15 degrees) for columnar trees, medium floods (25 to 40 degrees) for standard canopies, wide floods (60 degrees) for broad architectural surfaces.
Placement distance from tree trunks affects quality dramatically. Lights placed too close create harsh shadows and illuminate only the lowest branches. Proper placement ranges from 2 to 5 feet from the trunk base. Multiple fixtures at various positions create dimensional coverage without hot spots.
Downlighting and Moonlighting From Trees

Moonlighting fixtures mounted 20 to 30 feet high in mature tree canopies create the most natural-feeling outdoor illumination available. Light filters through leaves and branches, casting soft, dappled patterns on the ground that mimic actual moonlight. Non-invasive mounting brackets protect tree health. Wide beam angles (40 to 60 degrees) with warm white LEDs produce the best results.
Maintenance access planning matters for fixtures at height. Commercial-grade solid brass construction ensures the fixture lasts as long as the tree, minimizing difficult replacement work 25 feet above ground.
Technical Considerations in Outdoor Lighting Design
Low Voltage vs Line Voltage Systems
Low-voltage (12V) systems are the standard for residential landscape lighting. They present minimal shock hazards, simplify installation, and allow accessible maintenance. Transformer sizing requires calculating total wattage and accounting for future expansion. Size at 80% maximum capacity to leave headroom for additions. Voltage drop limitations govern maximum wire run lengths before fixture output suffers.
Color Temperature and LED Selection
Warm white LEDs (2700K to 3000K) are the standard for residential outdoor applications, creating an inviting ambiance where landscape colors appear natural. Cool white (4000K+) creates a sterile, commercial feel inappropriate for residential properties. Consistency across every fixture cannot be overstated. Mixing color temperatures creates jarring transitions. The ENERGY STAR LED lighting guidelines provide additional detail on LED performance ratings and efficiency standards.
IP Ratings and Weatherproofing for Coastal Climates
IP (Ingress Protection) ratings indicate how well a fixture resists dust and moisture. IP65 is the minimum for exposed outdoor fixtures. IP67 and IP68 are required for in-ground and submersible applications. Coastal Orange County’s salt air, combined with irrigation exposure and UV intensity, demands fixtures built to exceed these minimums. Improperly sealed wire junctions are the leading cause of fixture failure in outdoor systems, per NEMA electrical enclosure standards.
Wire Gauge, Voltage Drop, and Expansion Planning
Wire gauge selection directly affects system performance. 12-gauge wire handles longer runs with less voltage drop than 14-gauge. Calculating voltage drop over distance prevents the common problem where fixtures at the end of a run glow dimmer than those near the transformer. Home-run wiring (individual runs from transformer to each fixture zone) outperforms daisy-chain configurations for consistent brightness.
Concealed wiring at proper burial depth (6 to 12 inches for low voltage) protects against landscaper damage and creates clean results. Planning conduit routing for future expansion avoids tearing up finished landscaping when additional fixtures are added later.
Common Outdoor Lighting Design Mistakes to Avoid
Over-lighting the property. The runway effect with path lights, uplight overkill on every tree, and overall brightness that eliminates nighttime ambiance are signs of over-designed systems. Start conservatively. Adding fixtures later is far easier than removing ones already installed.
Designing during the day without nighttime testing. Glare issues invisible during daytime create serious discomfort after dark. Fixtures that seem well-positioned during daytime assessment may shine directly into eyes when illuminated. Only nighttime testing reveals these problems before permanent installation.
Choosing fixtures based on price instead of quality. Big-box aluminum and plastic fixtures corrode and fail within one to three years. Commercial-grade solid brass withstands decades of exposure. Coastal climate accelerates cheap fixture failure. Total cost of ownership consistently favors premium materials.
Ignoring placement precision and spacing standards. Path lights too close create runway effects. Uplights jammed against trunks produce harsh shadows. Downlights mounted too low expose visible glare. Inconsistent spacing looks awkward and unprofessional. These are the details that separate professional outdoor lighting layout from guesswork.
Professional Lighting Design vs DIY
What Professional Designers Bring
Professional lighting design delivers site-specific custom solutions that address unique property characteristics. Expertise in fixture quality, beam angles, voltage calculations, and placement precision eliminates trial-and-error. Concealed wiring installation standards create clean, professional results. Post-installation documentation provides system diagrams and maintenance information. Professional landscape lighting design services represent an investment in getting it right the first time.
When DIY Design May Work
Small, straightforward projects may work for DIY: adding path lights to an existing system, replacing failed fixtures, or installing string lights on a patio. However, comprehensive whole-property systems benefit enormously from design expertise that prevents expensive mistakes and produces dramatically better results.
Questions to Ask When Hiring a Lighting Designer
Ask about custom design versus template approaches. Inquire about fixture brands and material quality. Request post-installation documentation and concealed wiring guarantees. Confirm warranty coverage. Ask for Orange County project examples and verify the nighttime adjustment process, as the best designers test every fixture position after dark before finalizing.
Quick-Reference: Outdoor Lighting Design Specifications
Element | Specification | Notes |
Path light spacing | 8 to 12 ft apart, staggered | Closer at curves and steps |
Tree uplight distance | 2 to 5 ft from trunk | Multiple fixtures for large canopies |
Moonlight height | 20 to 30 ft in canopy | Wide beam, 40 to 60 degrees |
Color temperature | 2700K to 3000K warm white | Consistent across all fixtures |
Transformer sizing | 80% max capacity | Leave room for expansion |
IP rating (exposed) | IP65 minimum | IP67/68 for in-ground |
Wire gauge | 12-gauge for long runs | 14-gauge for short runs |
Burial depth (low voltage) | 6 to 12 inches | Conduit at hardscape crossings |
Fixture material | Commercial-grade solid brass | 20+ year coastal performance |
Transform Your Orange County Property With Professional Lighting Design
Thoughtful outdoor lighting design transforms properties from overlooked to extraordinary. Professional results come from the three-layer approach, balance and restraint, quality fixtures matched to applications, and respect for technical requirements. Good design is an investment in getting it right the first time.
Vision Outdoor Lighting brings 15 years of specialized experience to every professional landscape lighting design services project across Newport Beach, Irvine, Laguna Niguel, Coto de Caza, and throughout Orange County. Owner-led design ensures personal attention from consultation through post-installation refinement, using only commercial-grade brass fixtures engineered for lasting performance in coastal climates.
For a professional landscape lighting design consultation, contact Vision Outdoor Lighting or call (949) 877-3600.