The golden rule of lighting, as endorsed by DarkSky International and the Illuminating Engineering Society, is simple: light what you need, where you need it, in the amount needed, and no more.
For driveways, this means fixtures should illuminate the driving surface and its edges without blinding the driver, spilling into neighboring properties, or creating harsh pools of brightness that break the atmosphere of the surrounding landscape. This approach reflects the best way to light up a driveway, balancing visibility, safety, and design. The goal is to guide vehicles and pedestrians safely while maintaining the elegant, understated aesthetic that premium properties deserve.
Every driveway lighting decision should pass this test: does it help you see where you’re going without drawing attention to the fixtures themselves?
Choosing the Right Type of Driveway Lighting Fixtures
Not all outdoor driveway lighting fixtures serve the same purpose. The best systems combine multiple fixture types into a layered design. Here are the most effective driveway lighting fixtures used in professional installations.
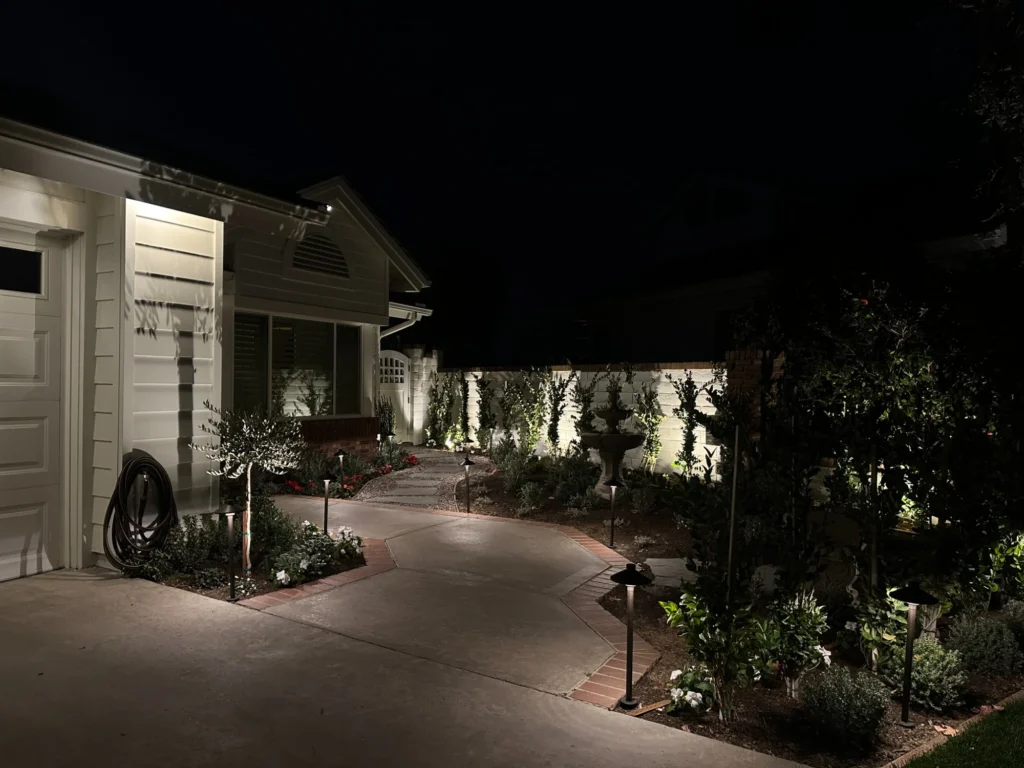
Path lights are the most common choice for driveway edge lighting. Mounted on 14 to 24 inch posts along the driveway border, they cast a gentle downward glow that defines the edge of the pavement without blinding drivers. Space them 8 to 10 feet apart on alternating sides for even, natural-looking coverage.
Bollard lights are taller, sturdier fixtures (typically 24 to 36 inches) that provide more architectural presence. They work well on long driveways and circular drives where a bolder visual marker helps define the path. Bollards are especially effective at turns and transition points.
In-ground well lights sit flush with the surface, making them invisible during the day. Installed along the driveway edge or recessed into hardscape borders, they provide a clean, modern look. They’re ideal for contemporary properties where visible fixtures would disrupt the design aesthetic.
Downlights (moonlighting) mounted in trees flanking the driveway cast soft, filtered light across the driving surface from above. This technique creates the most natural-feeling driveway illumination and eliminates any glare at driver eye level.
Spotlights aimed at trees, columns, or pillar structures along the driveway provide accent lighting that indirectly illuminates the drive while showcasing landscape features. This layered approach adds depth and visual interest that edge lighting alone cannot achieve.
For a deeper dive into fixture options, see our guide to types of landscape lighting.
Driveway Lighting Placement by Layout Type
How to light a driveway depends heavily on its shape, length, and surrounding landscape. Here are driveway lighting ideas tailored to the most common layouts.
Straight Driveways
Straight driveways are the simplest to light but the easiest to over-light. The biggest mistake is lining both sides with evenly spaced path lights, which creates a runway effect that feels commercial rather than residential.
Instead, stagger fixtures on alternating sides at 8 to 10 foot intervals. This creates a gentle rhythm of light pools that guides the eye without rigid symmetry. Supplement the edge lights with one or two spotlights on trees or landscape features flanking the driveway to add dimension.
Long Driveways
Long driveway lighting requires a strategic approach to avoid using dozens of fixtures that drive up cost and create visual clutter. Focus lighting at three key zones: the entrance, any curves or grade changes, and the final approach to the house.
In the middle stretches, tree-mounted downlights can provide ambient illumination without requiring ground fixtures every 8 feet for 200+ feet. If the driveway passes through a tree-lined section, moonlighting from the canopy is the most elegant and cost-effective solution for those longer runs.
Circular Driveways
Circular driveway lighting needs to define the full loop while emphasizing the center island and the approach to the front entry. Light the outer edge with path lights or bollards spaced 8 to 10 feet apart, staggered rather than parallel.
The center island is a prime opportunity for accent lighting. Uplight a feature tree, illuminate a fountain, or wash light across ornamental plantings in the island to create a focal point that draws the eye as guests pull in. This center illumination indirectly lights the surrounding driveway surface as well.
Driveway Entrance Lighting: Making a First Impression
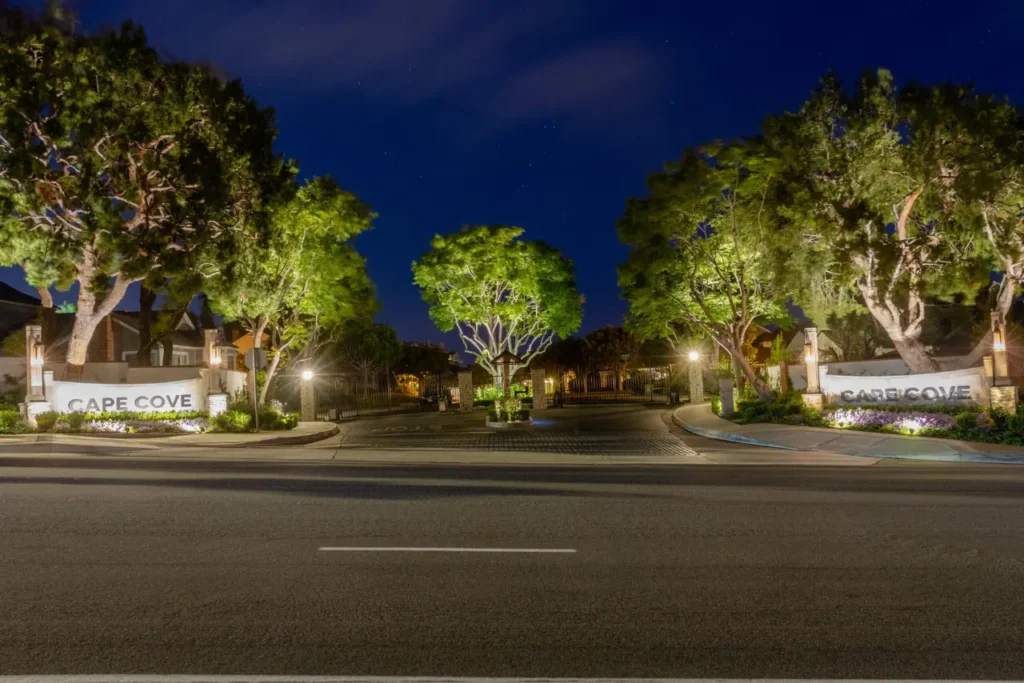
The driveway entrance is where you set the tone for the entire arrival experience. Strong driveway entrance lighting helps guests find your property, signals the transition from public road to private space, and establishes the design character of everything that follows.
If your driveway has entry pillars or gate posts, uplight them with spotlights or well lights at the base. For pillars, mount fixtures directly centered below each column aimed straight up for a clean vertical wash. Add a cap light or downlight on top for functional illumination of the driveway surface at the entrance.
For properties without pillars, use a pair of slightly taller bollard lights or accent spotlights on flanking trees to define the entry point. The goal is creating a visible threshold that communicates “you’ve arrived” without a flood light announcing it from 200 feet away.
Modern Driveway Lighting Ideas
Contemporary properties benefit from driveway lighting fixtures that match their clean-lined aesthetic. Here are modern driveway lighting ideas that work well with current architectural styles.
Recessed in-ground LED strips installed along both driveway edges create a sleek, continuous line of light that defines the path without any vertical fixtures. This is one of the most striking outdoor driveway lighting approaches for modern homes.
Flush-mounted well lights recessed into concrete or paver borders provide uplighting effects without breaking the clean surface plane. They work especially well alongside driveways with low retaining walls or raised planting beds.
Minimalist bollards with geometric forms and dark finishes complement modern facades. Choose fixtures with shielded tops that direct light downward, preventing upward light spill and glare.
For inspiration and examples, visit our driveway lighting design and installation page to see how these concepts come together on real Orange County properties.
Common Outdoor Driveway Lighting Mistakes
These are common issues highlighted in any professional landscape lighting guide and should be avoided to ensure both safety and visual balance.
The runway effect. Placing identical fixtures at equal intervals on both sides of a straight driveway creates rigid, commercial-looking symmetry. Stagger fixtures on alternating sides instead.
Single flood light on the garage. One powerful flood above the garage door creates harsh shadows, blinds drivers pulling in, and illuminates the driveway unevenly. Replace it with multiple softer fixtures distributed across the approach for balanced coverage.
Fixtures too close to pavement. Lights placed right at the pavement edge get hit by car tires, sprayed by puddles, and knocked by snowplows or landscaping equipment. Position fixtures 6 to 12 inches back from the edge, set into landscape beds or behind low borders.
Ignoring glare from indoor viewpoints. A perfectly placed driveway light can create annoying glare when viewed from a living room window. Always check fixture positions from indoor seating areas, not just from the curb.
Cheap fixtures that fail fast. Driveways expose fixtures to vehicle vibration, irrigation spray, and constant weather. In Orange County’s coastal climate, aluminum and plastic fixtures corrode and crack within a few years. Commercial-grade solid brass withstands these conditions for 20+ years.
Quick-Reference: Driveway Lighting Placement by Layout
| Layout | Primary Approach | Spacing |
| Straight | Staggered path lights + tree accents | 8 to 10 ft, alternating sides |
| Long | Zone lighting: entrance, curves, approach + moonlighting mid-sections | Key zones only |
| Circular | Outer edge staggered path/bollards + center island accent | 8 to 10 ft outer edge |
| Entrance/Gate | Pillar uplights + cap lights or flanking bollards | Paired at entry points |
| Garage Approach | Soffit downlights + flanking accent spots | 2 to 3 downlights across |
Frequently Asked Questions About Driveway Lighting
What is the best way to light a driveway?
The best approach combines low-profile edge lighting (path lights or bollards spaced 8 to 10 feet apart on alternating sides) with accent lighting on trees and landscape features flanking the driveway. Focus extra lighting at the entrance, any curves or grade changes, and the final approach to the house. Use warm white LEDs (2700K to 3000K) and shielded fixtures that direct light downward to avoid glare.
What is the 5-7 light rule?
The 5-7 rule is a general interior design principle about grouping decorative objects in odd numbers (3, 5, or 7) for visual balance. In outdoor lighting, the more relevant guideline is practical: for most residential driveways, 5 to 7 fixtures per 50 feet of driveway length provides balanced coverage when staggered on alternating sides. The exact count depends on fixture brightness, beam angle, and your specific layout.
Where should driveway lights be placed?
Place lights at the driveway entrance, at every curve or direction change, at grade changes or steps, and along the final approach to the house. Position fixtures 6 to 12 inches back from the pavement edge to protect them from vehicle traffic. Stagger fixtures on alternating sides rather than parallel for a more natural, residential feel.
What is the golden rule of lighting?
The golden rule, as defined by DarkSky International and the IES, is to light what you need, where you need it, in the amount needed, and no more. For driveways, this means providing enough illumination for safe navigation without over-lighting, creating glare, or spilling light onto neighboring properties. Restraint produces more elegant results than brightness.
How do you light up a driveway without power?
Solar-powered path lights are the most common option for driveways without nearby electrical access. They require no wiring and charge during the day. However, solar fixtures offer limited brightness, inconsistent performance on cloudy days, and shorter lifespans compared to hardwired low-voltage LED systems. For permanent, reliable driveway lighting, a professional low-voltage installation with a properly placed transformer is the better long-term investment.
What are common outdoor lighting mistakes for driveways?
The most common mistakes are creating a runway effect with parallel fixtures, relying on a single flood light above the garage, placing fixtures too close to the pavement edge, ignoring glare from indoor viewpoints, and using cheap fixtures that corrode in outdoor conditions. Each of these is avoidable with proper design and material selection.
Transform Your Driveway With Professional Lighting Design
The best way to light up a driveway isn’t about buying the most fixtures or the brightest bulbs. It’s about thoughtful placement, the right combination of fixture types, and materials built to last in Orange County’s demanding outdoor environment.
At Vision Outdoor Lighting, every driveway project is designed on-site after dark, testing fixture positions and angles in real conditions before anything is installed permanently. We use commercial-grade solid brass fixtures on every project across Newport Beach, Irvine, Coto De Caza, and throughout Orange County.
Request a project estimate by visiting our contact page or calling us directly at (949) 877-3600.
Looking for more lighted driveway ideas? Visit our driveway lighting portfolio to see real Orange County projects.
Explore our landscape lighting resources for more tips and ideas.