Govee permanent outdoor lights mount along eaves and rooflines using VHB adhesive strips and plastic clips. Most homeowners can install a 100-foot system in 3 to 5 hours with a ladder, measuring tape, and the included hardware. The lights are IP67-rated, plug into a standard GFCI outdoor outlet, and are controlled through the Govee Home app with Alexa and Google Assistant compatibility. They work well for color-changing holiday and accent lighting at a consumer price point. For homeowners wanting commercial-grade permanent LED lighting with concealed wiring, brass construction, and integration with a broader landscape lighting system, professional installation delivers a different level of durability and design.
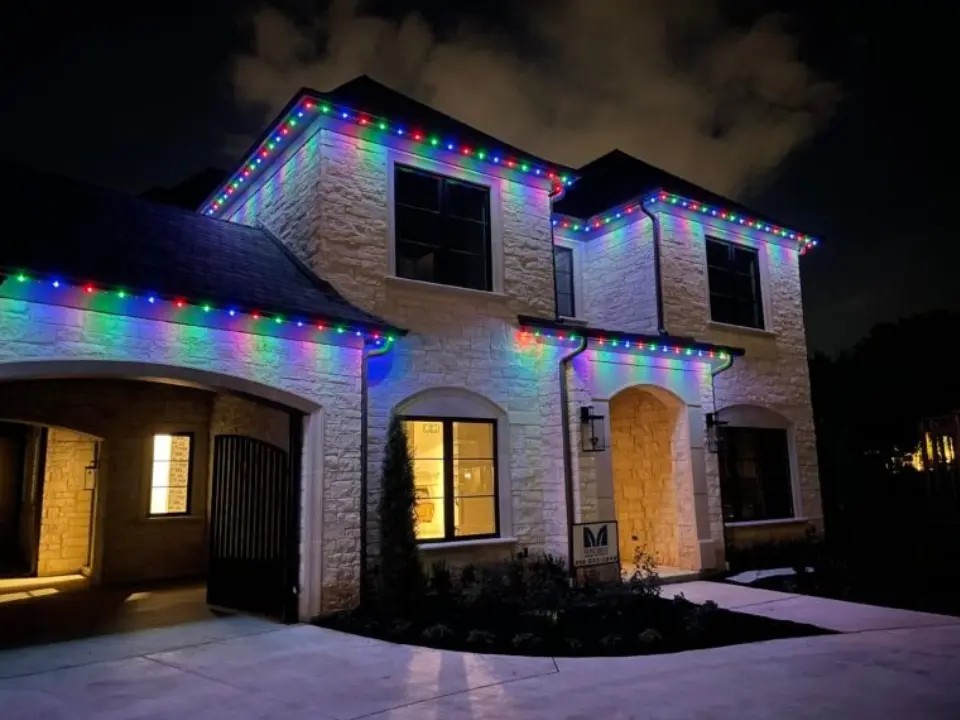
Govee has become one of the most popular names in consumer smart outdoor lighting, and for good reason. Their permanent outdoor lights offer year-round RGB outdoor lights with app control, music sync, and scene modes at a price point that puts programmable color within reach for most homeowners. The product has earned its reputation as a solid entry point for installing permanent Christmas lights that pull double duty as year-round outdoor lights.
This guide covers how to install Govee permanent outdoor lights from start to finish: measuring and planning, mounting the channel, placing the LED track, connecting power, configuring the app, and weatherproofing the installation. It also covers where Govee systems fit well, where they fall short, and when professional alternatives make more sense. For a broader overview of outdoor lighting approaches, start with our outdoor lighting tips guide.
What You Need Before Starting Your Govee Installation
Measuring Your Roofline
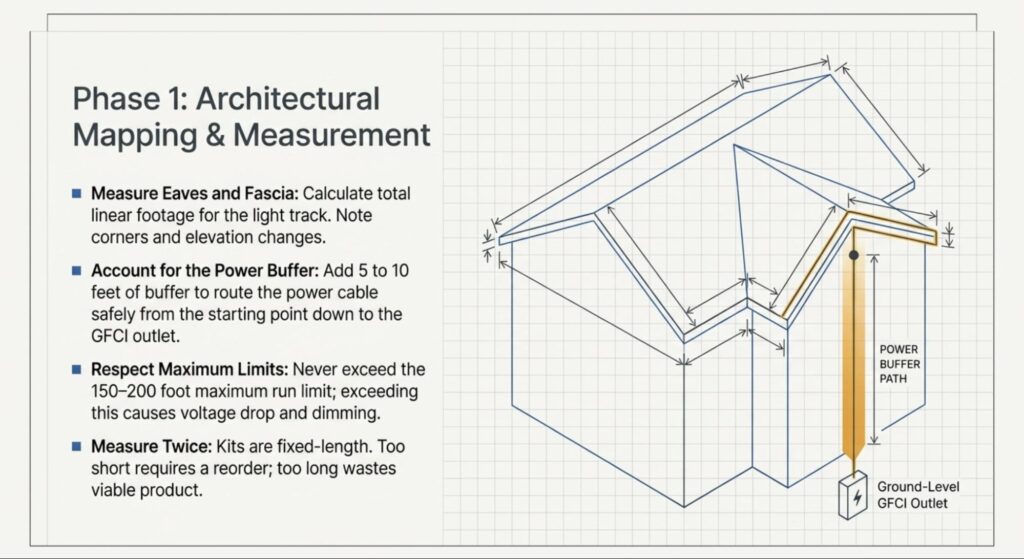
Measure the total length of eaves, fascia, or roofline where you plan to mount the lights. Govee permanent outdoor lights come in 50-foot, 100-foot, and 150-foot lengths depending on the model. The Pro version extends up to 200 feet with extensions. Maximum total run length cannot exceed the manufacturer’s limit (typically 150 to 200 feet depending on the model).
Account for corners, transitions, and the distance from the mounting line back to your power source. Add 5 to 10 feet of buffer for routing the power cable from the control box to the GFCI outlet. Measure twice. Ordering a system that’s too short means a return and reorder; ordering too long means cutting and potentially wasting a section.
Tools and Materials
Govee includes the mounting clips, VHB adhesive strips, control box, power adapter, and LED light track in the kit. You will need a sturdy extension ladder (or multiple ladders for two-story homes), a measuring tape, rubbing alcohol and a clean cloth for surface prep, a pencil for marking clip positions, and potentially a drill with screws if you prefer mechanical fastening over adhesive in exposed areas.
A second person makes the job significantly easier and safer, especially when working on ladders along the roofline of a two-story home.
Step-by-Step Govee Outdoor Lights Installation
Step 1: Clean and Prep the Mounting Surface
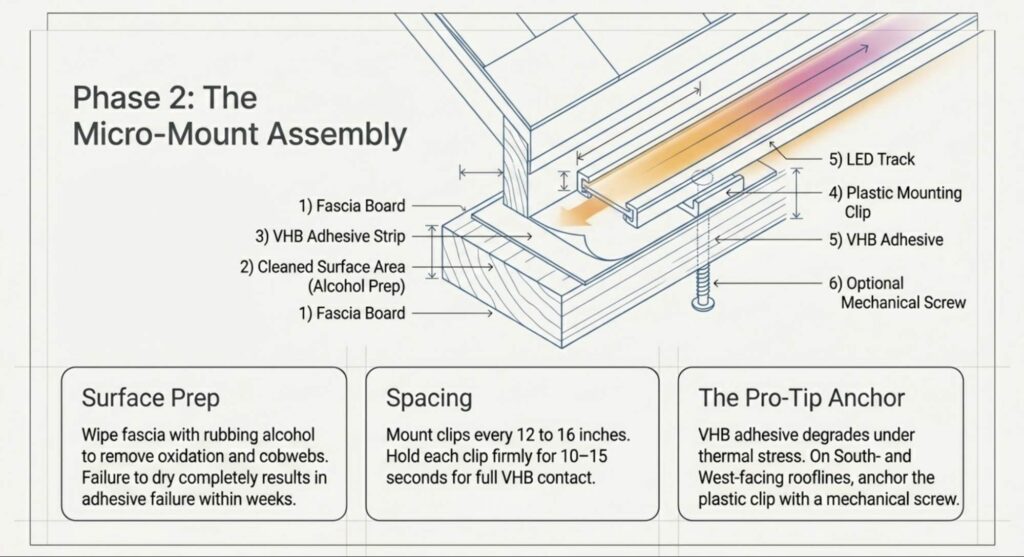
The VHB adhesive that holds the mounting clips needs a clean, dry surface to bond properly. Wipe the fascia or eave surface with rubbing alcohol to remove dust, dirt, cobwebs, and oxidation. Allow it to dry completely before applying any clips. Skip this step and the clips will fail within weeks, especially in Orange County’s sun-baked conditions where adhesive is already under thermal stress.
Step 2: Mark Clip Positions and Install Mounting Clips
Space clips approximately every 12 to 16 inches along the mounting line. Mark positions with a pencil before applying adhesive. At corners and direction changes, place clips on both sides of the turn for secure holding. Press each clip firmly onto the cleaned surface and hold for 10 to 15 seconds to ensure full VHB contact.
Pro tip: In areas exposed to direct afternoon sun or coastal wind, supplement adhesive clips with screws driven into the fascia board. Adhesive-only mounting is the most common failure point in Govee installations, particularly on south-facing and west-facing rooflines that absorb maximum heat.
Step 3: Snap the LED Light Track Into Clips
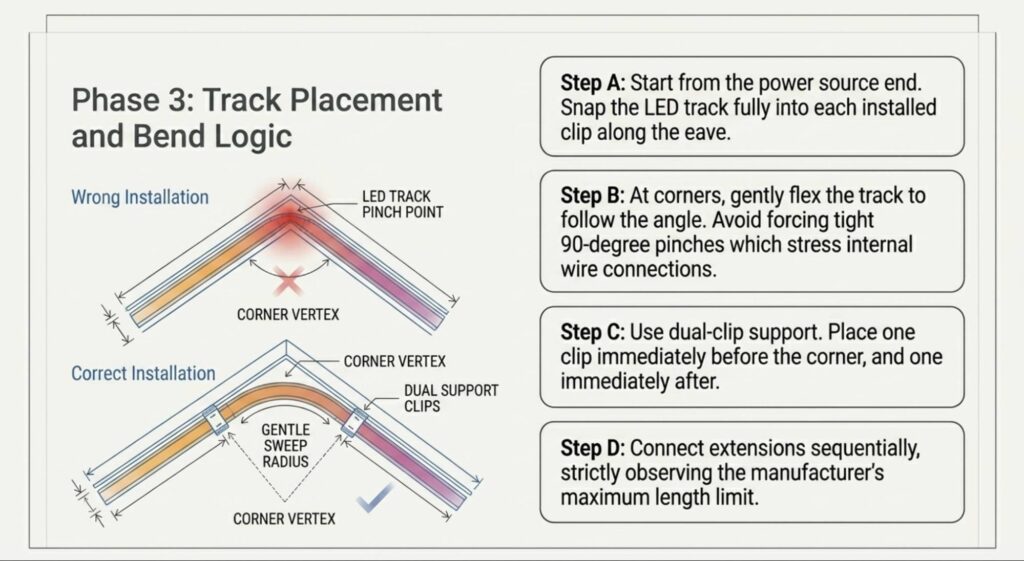
Starting from the power source end, snap the LED light track into each clip along the roofline. Work section by section, ensuring the track seats fully into every clip. At corners, gently bend the track to follow the roofline angle. Govee’s track is designed to flex at corners, but forcing tight 90-degree turns can stress the internal connections.
If the run is longer than what one kit provides, connect extension segments following the manufacturer’s instructions. Never exceed the stated maximum total length.
Step 4: Mount the Control Box and Connect Power
Mount the control box in a sheltered location near your GFCI outdoor outlet. The control box is rated IP65, meaning it handles rain but benefits from eave coverage or a weatherproof housing. Connect the LED track cable to the control box and plug the power adapter into the GFCI outlet.
Important: The power adapter is rated for indoor use only on most Govee models. If your outlet is fully exposed, house the adapter inside a weatherproof outlet cover or route the cable through a wall to an interior outlet. Exposing an indoor-rated adapter to rain is a safety hazard and a common installation mistake.
Step 5: Configure the Govee Home App
Download the Govee Home app and create an account. Power on the system, then follow the in-app pairing process to connect via Bluetooth or Wi-Fi. Once paired, the app lets you select from 100+ preset scene modes, create custom colors and patterns, set schedules and timers, sync lights to music, and integrate with Alexa, Google Assistant, or Matter-compatible smart home platforms.
The app is where Govee’s smart outdoor lighting value becomes clear. The ability to switch from warm white daily lighting to red and green for Christmas, orange and purple for Halloween, or team colors for game day without touching the physical hardware is what makes permanent LED lights installation appealing compared to swapping out traditional holiday displays each season.
Step 6: Test and Adjust
Power on after dark and walk the perimeter. Check for even brightness across the full run. Look for any sections where clips have not fully seated the track (causing uneven light direction). Verify the control box is secure and the power adapter is protected from moisture. Test scene modes, color accuracy, and scheduling through the app.
Weatherproofing Your Govee Installation in Orange County
Govee permanent outdoor lights carry an IP67 rating on the light track, which means they handle rain, dust, and temporary water exposure well. The control box is IP65. These ratings are adequate for most installations, but Orange County’s specific conditions create additional challenges.
Salt air exposure: Coastal properties from Seal Beach to Dana Point face salt-laden air that accelerates corrosion on connectors and degrades plastic housings faster than inland installations. Inspect connection points every 6 months on coastal properties.
UV degradation: South-facing and west-facing rooflines absorb intense UV radiation year-round. Over 2 to 4 years, this breaks down both the VHB adhesive and the plastic housing of the LED track. Expect adhesive failures and possible clip replacement within this timeframe.
Heat cycling: Orange County rooflines can reach 140°F+ in direct summer sun and drop to 40°F on winter mornings. This daily expansion and contraction cycle stresses adhesive bonds and can cause clips to release over time.
Orange County HOA Considerations for Permanent Outdoor Lights
Many Orange County communities have HOA guidelines that regulate exterior modifications, including visible lighting hardware. Govee’s mounting track is visible from the street during daytime, which may require HOA approval in communities with strict architectural standards.
Before installing, check your CC&Rs for language about permanent exterior lighting, roofline modifications, or visible hardware. Some communities in Newport Beach, Coto de Caza, and gated neighborhoods throughout Orange County restrict visible lighting tracks along rooflines. Others allow them with board approval. Getting this sorted before drilling holes or applying adhesive prevents the frustration of a forced removal after installation.
Govee Permanent Outdoor Lights Specifications at a Glance
| Specification | Detail |
| IP rating (lights) | IP67 (dust-tight, temporary immersion) |
| IP rating (control box) | IP65 (dust-tight, water jet resistant) |
| Color range | 16 million colors (RGBIC/RGBICWW) |
| Color temperature | 2700K to 6500K (warm to cool white) |
| Max run length | 150 to 200 ft depending on model |
| Light spacing | ~16.4 inches (417mm) between lights |
| Rated lifespan | 50,000 hours |
| Warranty | 3 years |
| Mounting method | VHB adhesive strips + plastic clips |
| Smart control | Govee Home app, Matter, Alexa, Google |
| Power adapter | Indoor-rated (requires weather protection) |
Source: Govee Permanent Outdoor Lights product line.
Govee vs Professional Permanent Lighting Systems
Govee fills a specific role well: affordable, app-controlled, color-changing lighting for homeowners who want year-round outdoor lights without a large upfront investment. For that use case, it delivers real value.
Professional permanent LED lighting systems occupy a different category entirely. The differences matter most for homeowners who prioritize longevity, clean aesthetics, and integration with a broader landscape lighting plan.
Mounting and visibility: Govee uses visible plastic clips and track along the roofline. Professional systems use concealed mounting with no visible hardware during the day, integrating the lighting into the architecture rather than adding a visible strip to it.
Materials and durability: Govee uses plastic housings and adhesive mounting designed for consumer use. Professional systems use commercial-grade brass or aluminum housings with mechanical fasteners engineered for 20+ year performance in coastal environments.
Wiring: Govee plugs into a standard outlet with a visible power cable. Professional installations use concealed, hardwired electrical connections with no visible cords, managed by a licensed electrician and code-compliant wiring.
Warranty: Govee offers 3 years. Professional permanent lighting systems typically carry 15-year to lifetime manufacturer warranties on fixtures, plus workmanship guarantees on installation.
Integration: Govee operates independently through its own app. Professional systems integrate with the entire landscape lighting plan, operating on the same transformer, controller, and design logic as tree lighting, path lighting, and architectural accents across the property.
Neither option is universally “better.” Govee is a solid product at its price point for homeowners who want smart outdoor lighting with minimal investment and are comfortable with consumer-grade durability. Professional systems are the choice for properties where appearance, longevity, and system integration justify a larger investment. For more on how different types of landscape lighting work together, see our complete guide.
Maintaining Your Govee System Over Time
Govee permanent outdoor lights require periodic attention to maintain performance. Inspect clips and adhesive every 3 to 6 months, especially after summer heat cycles and Santa Ana wind events. Re-secure any sections that have loosened. Clean the LED track with a soft damp cloth annually to remove dust, cobwebs, and salt residue that accumulate on the housing and reduce light output.
Check the control box connections and power adapter for signs of moisture intrusion or corrosion. Replace the entire adapter if you notice discoloration, fraying, or a burning smell. Wi-Fi connectivity can drop after firmware updates or router changes, so re-pair through the Govee Home app if the system becomes unresponsive. For broader LED lifespan context, see our guide on how long LED lights last.
Common Govee Installation Mistakes to Avoid
Skipping surface prep. Dirty fascia boards cause adhesive failure within weeks. Always clean with rubbing alcohol and let dry completely.
Relying entirely on adhesive in sun-exposed areas. Supplement with screws on south-facing and west-facing rooflines. The adhesive is strong initially but degrades under sustained UV and heat cycling.
Leaving the power adapter exposed. Most Govee adapters are indoor-rated. Protect them from rain and direct sun with a weatherproof outlet cover or route the cable indoors.
Exceeding maximum run length. Connecting extensions beyond the stated limit causes voltage drop, dimming, and potential control box overload.
Installing without HOA clearance. In governed Orange County communities, get written approval before mounting visible hardware on your roofline.
When Professional Permanent Lighting Makes More Sense
This guide covers how to install Govee permanent outdoor lights for homeowners who want a capable, affordable smart outdoor lighting system they can set up themselves. For many homeowners, Govee delivers exactly what they need.
For properties where concealed hardware, commercial-grade durability, hardwired electrical, and integration with a full landscape lighting system matter, professional permanent LED lights installation delivers results at a different level. Vision Outdoor Lighting does not install Govee or other consumer products. Instead, every project uses commercial-grade components with concealed wiring, owner-led installation, and comprehensive system documentation designed to perform for 20+ years in Orange County’s coastal conditions.
For professional permanent LED lighting installation in Newport Beach, Irvine, Coto de Caza, Laguna Niguel, or anywhere in Orange County, contact Vision Outdoor Lighting or call (949) 877-3600.